

New to the BLG20x?
What you are building
The BLG20x is a gateway. It listens for small Bluetooth sensors around it, keeps what they say, and forwards it over a mobile network to a platform you choose. Nothing you do here writes any of your data to Adsum.The hardware
The BLG20x is made and sold by Fanstel, as a desk- or wall-mount unit with the radios, antennas and power supply already in the box. This guide was captured on a BLG20XE02C-V1; the other models in the family run the same evaluation firmware.

The two halves. The Bluetooth half hears your sensors and decides what is worth keeping. The wide-area half owns the modem and the schedule. They talk to each other over two wires, and each can only report what it knows itself, which is why, later, a message the sender logs is not proof the receiver got it.
Adsum IoT Coder, in one paragraph
Adsum IoT Coder is a VS Code extension. For this run it does three jobs: it knows the procedure for this board, it fetches and verifies the firmware images, and it drives the programming commands with your approval. You can do every step by hand instead (the commands are in this guide), but the extension is what stops you flashing the wrong chip.What you need
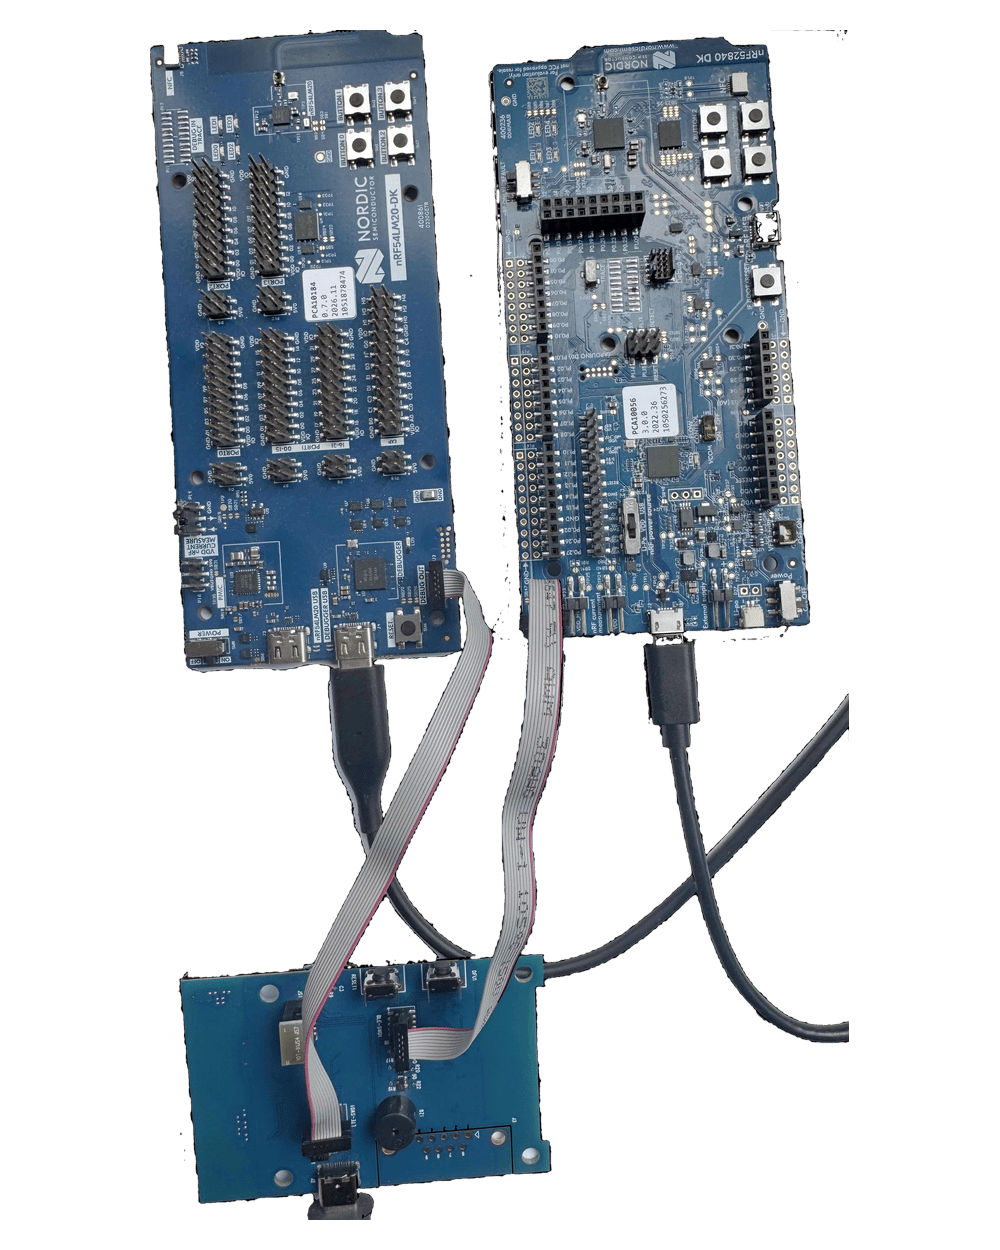
about 20 minutes to gather- Front
- Back
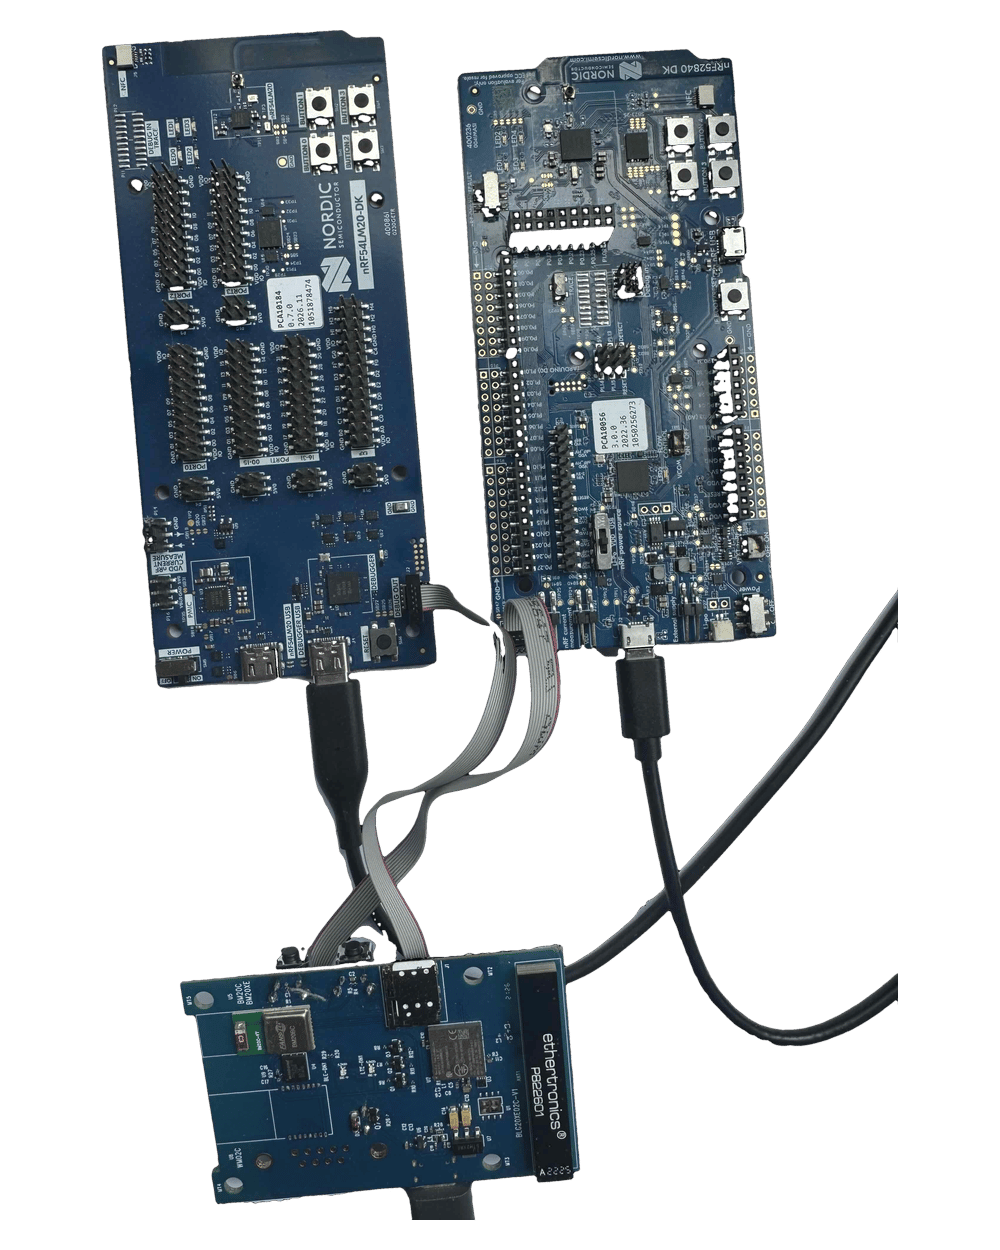
The BLG20x board face up, with the two development kits cabled to its debug headers.
ThingsBoard: what it is, and why you need it
ThingsBoard is an IoT platform: a service that devices send their readings to, and that stores them, charts them on dashboards, raises alarms on them and sends commands back. It is open source, and ThingsBoard Cloud is the same software run as a hosted service, so there is nothing to install. The gateway needs one because it only collects. It keeps readings locally, but a gateway that only keeps them is a logger: it needs somewhere off-site to send them, a place to look at them, and a way to reach the unit when it is in the field. In this run ThingsBoard is where three things happen:- Step 6: the unit’s readings arrive, each with the device’s own timestamp;
- Step 7: you send a command back to the unit from the device’s page;
- the device token ThingsBoard issues is what the unit presents to prove it is yours.
Where to create the account
The whole run at a glance
Eight steps. Two of them wait on the unit’s own radio cycle, which is where most of the waiting is.

Where the time goes. Steps 1–5 are as fast as you are. Steps 6 and 7 each wait for the unit to wake its radio. Nothing is wrong while they wait, and restarting the board only restarts the clock.
Step 1a: Start the run
Open VS Code, open the Adsum IoT Coder panel, and open a folder for this project. The panel offers a few ways in; you want the one for this board.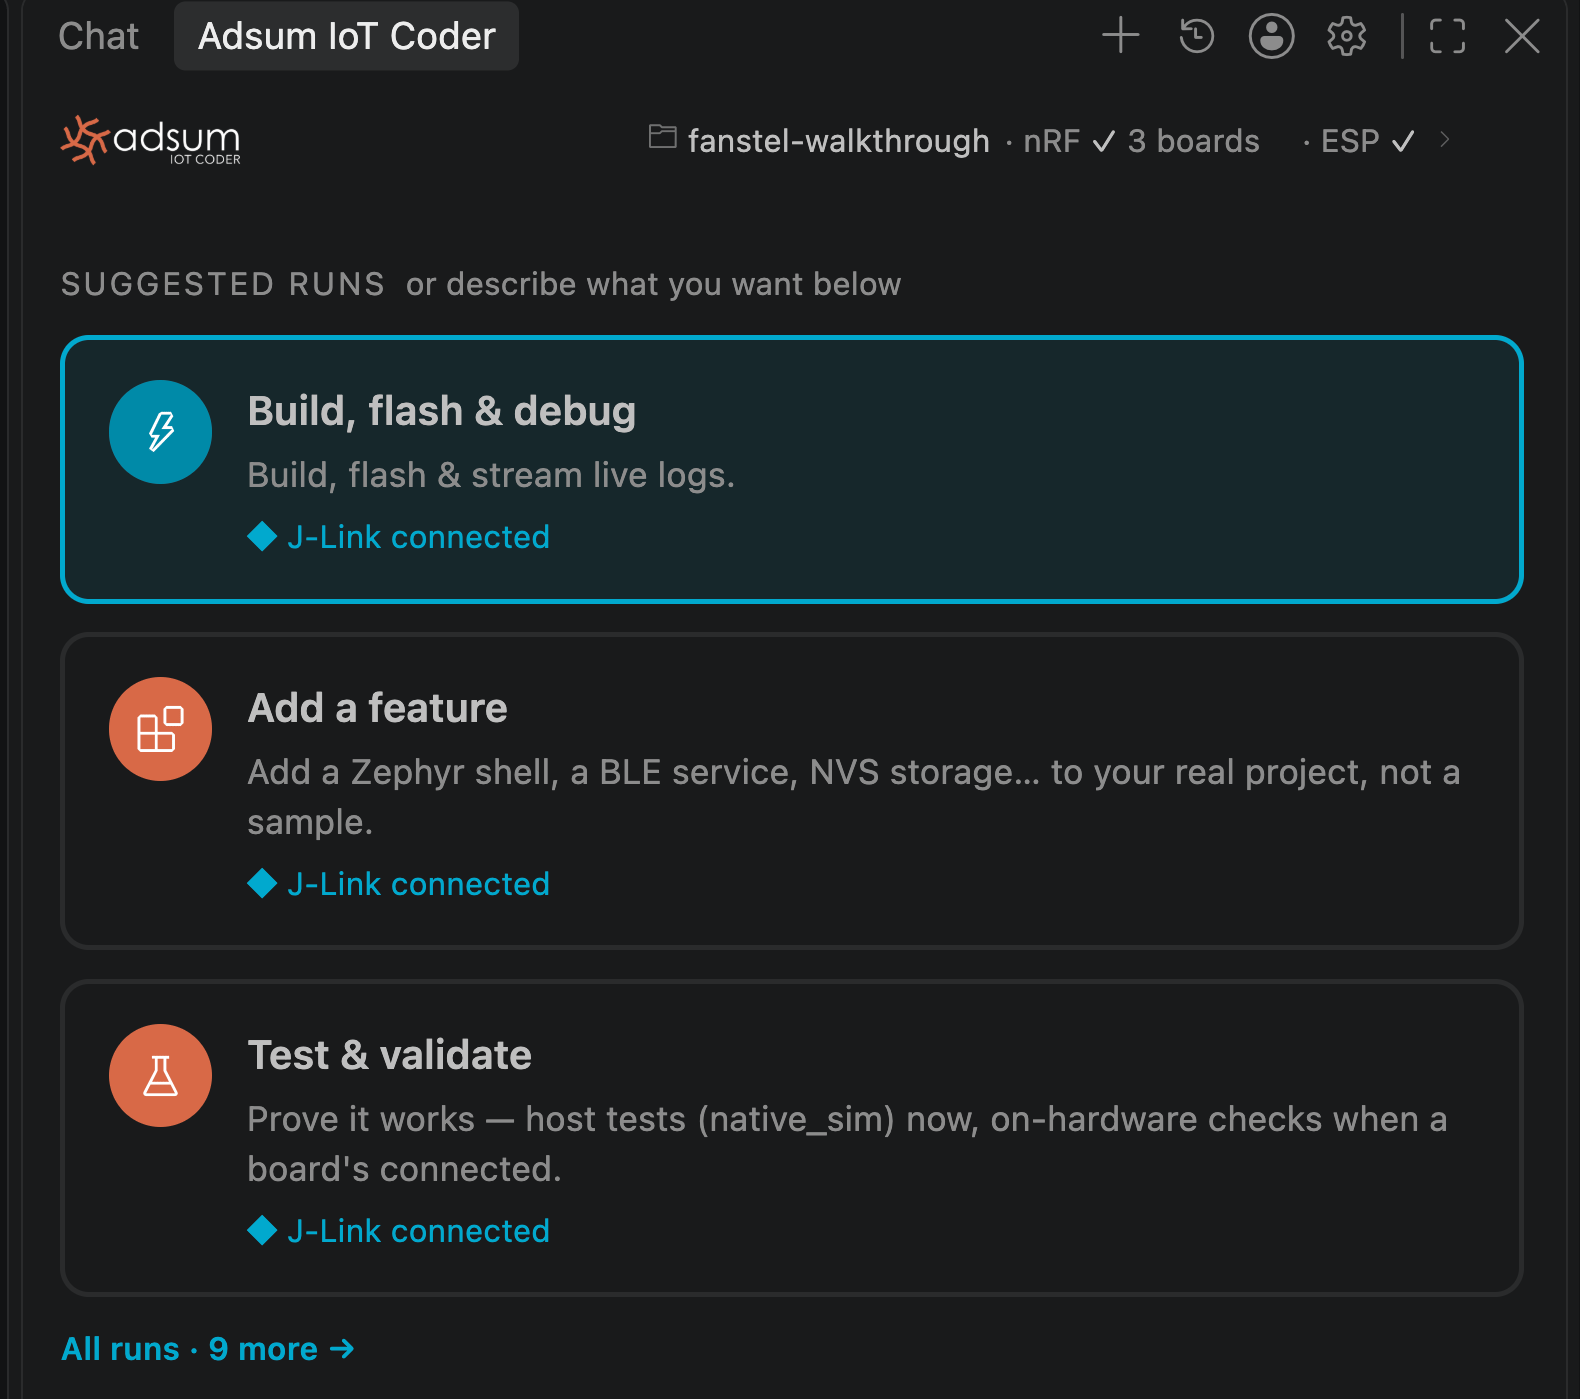
The panel. Suggested runs sit at the top, and cards for boards it recognises sit below them.
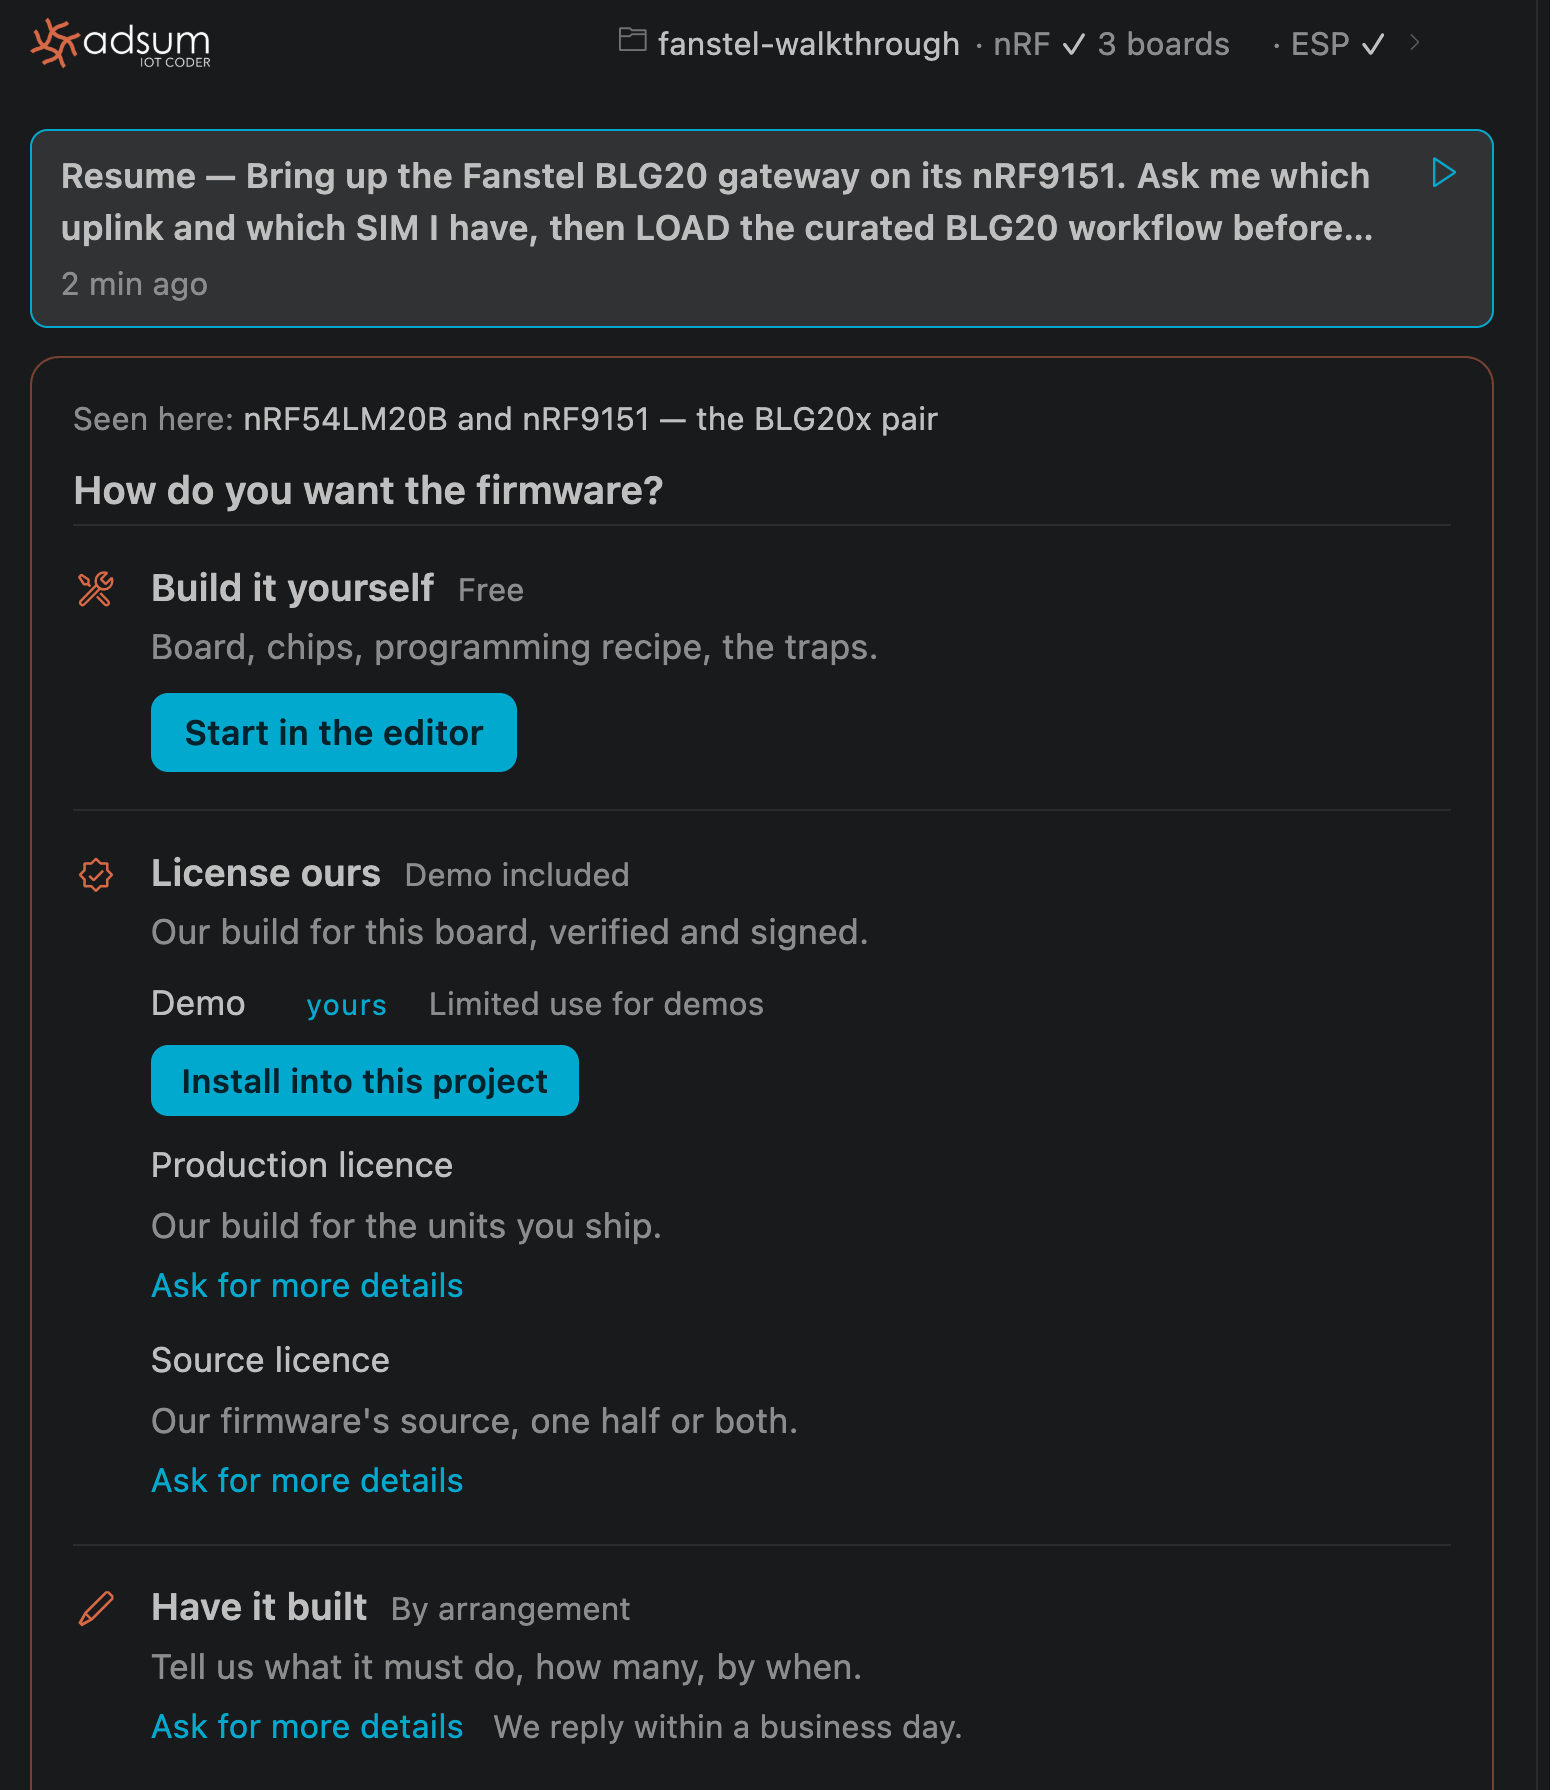
The BLG20x card. Two ways in: build the firmware yourself, or install the images we already built and verified. This guide takes the second: Install into this project.
Step 1b: Install the images
about 2 minutes The install lists what it will write, checks each file against a recorded hash before writing it, and states the firmware’s limits before anything lands on disk.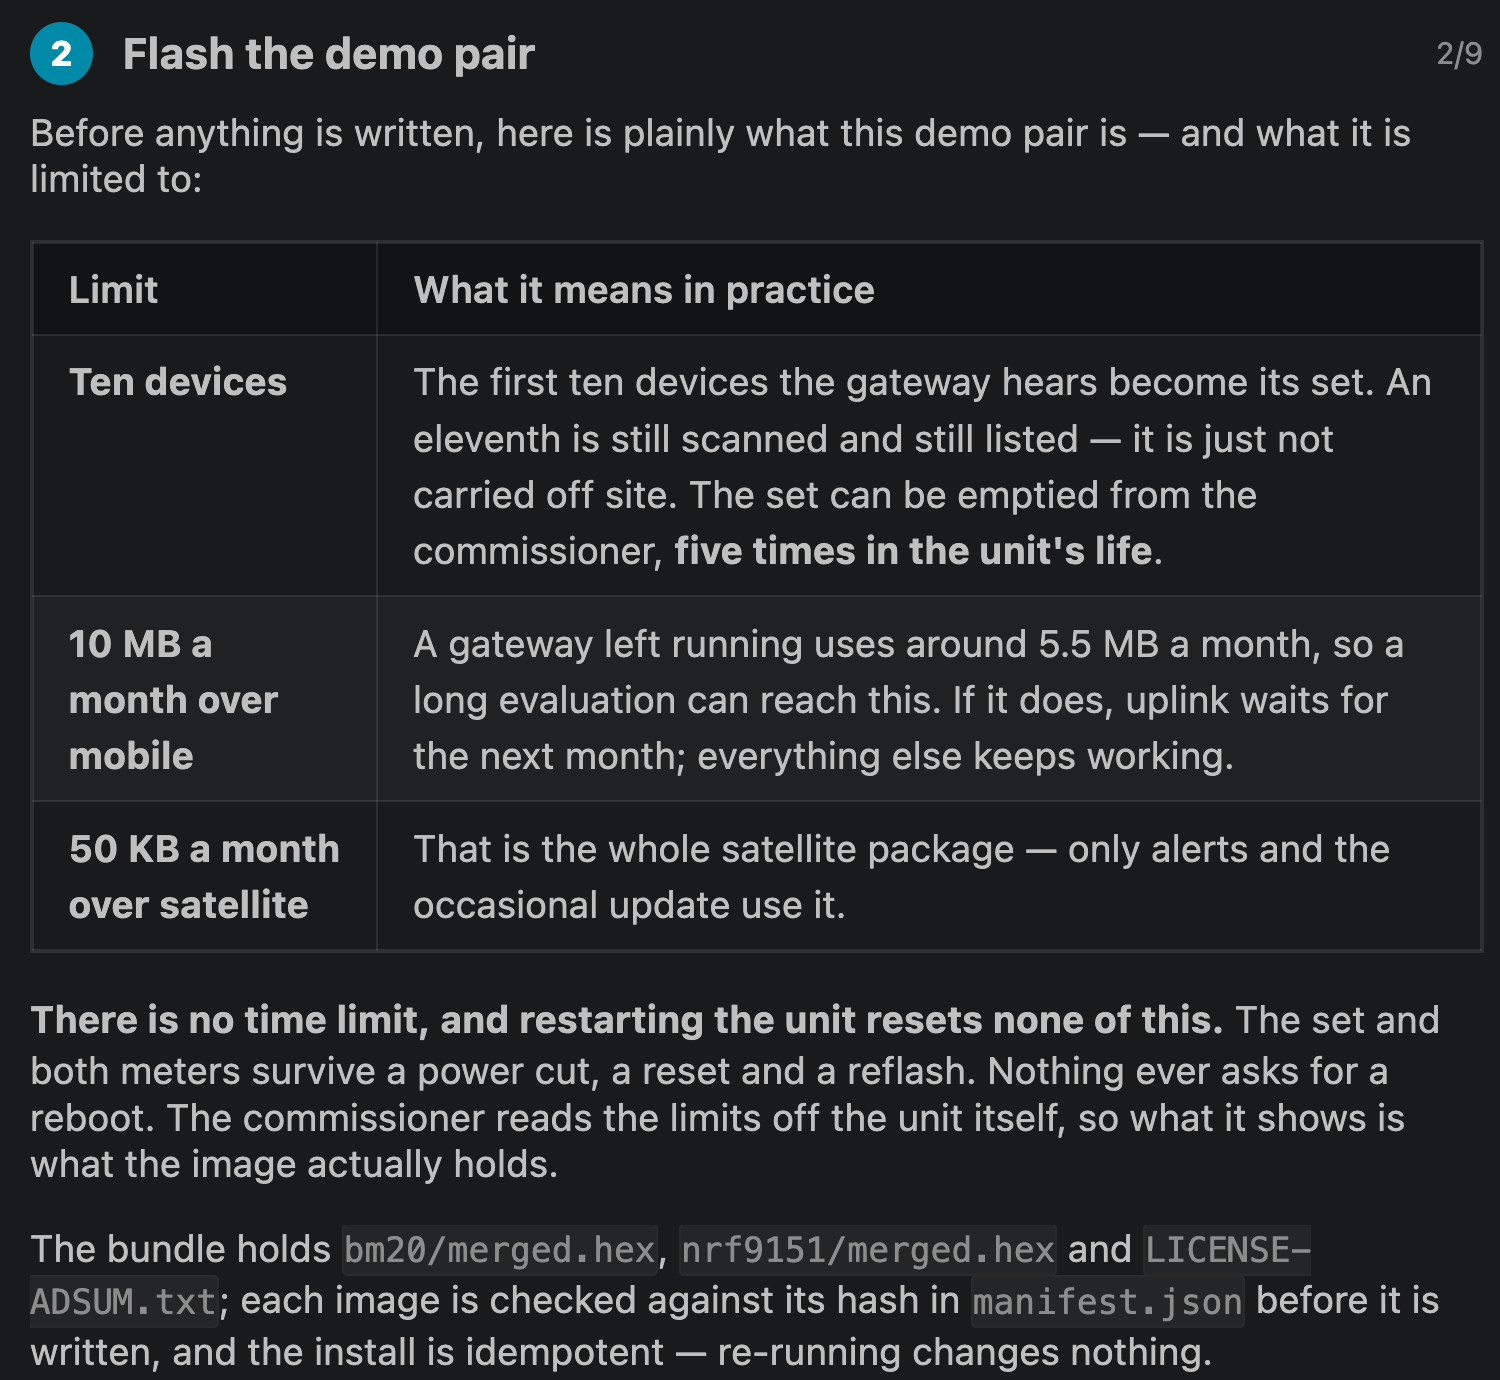
The limits, before the install rather than after. This capture is from September, when the satellite allowance was 50 KB a month; today's demo allows 10 KB, with ten devices, 10 MB a month over mobile and no time limit.
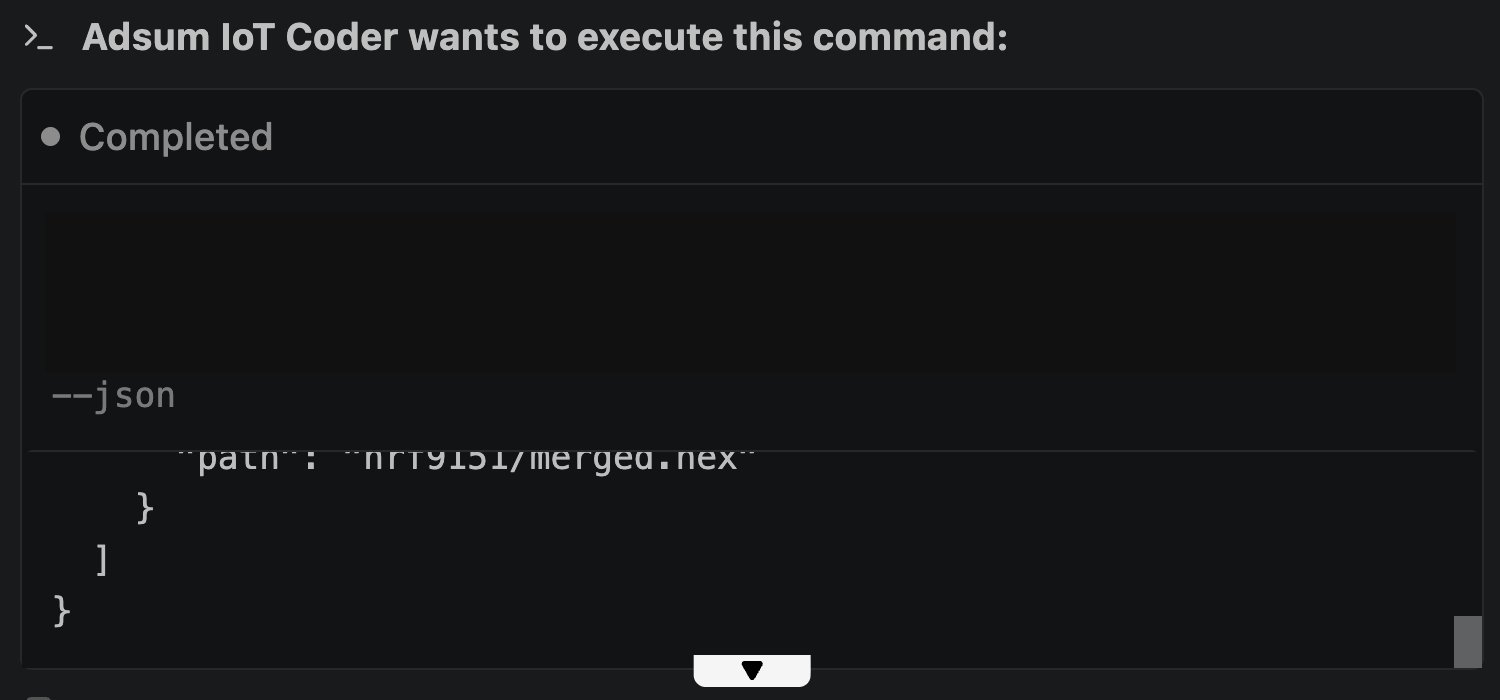
--list first, then --into. A truncated image programs happily and then never boots, which is why the hash check is not optional.
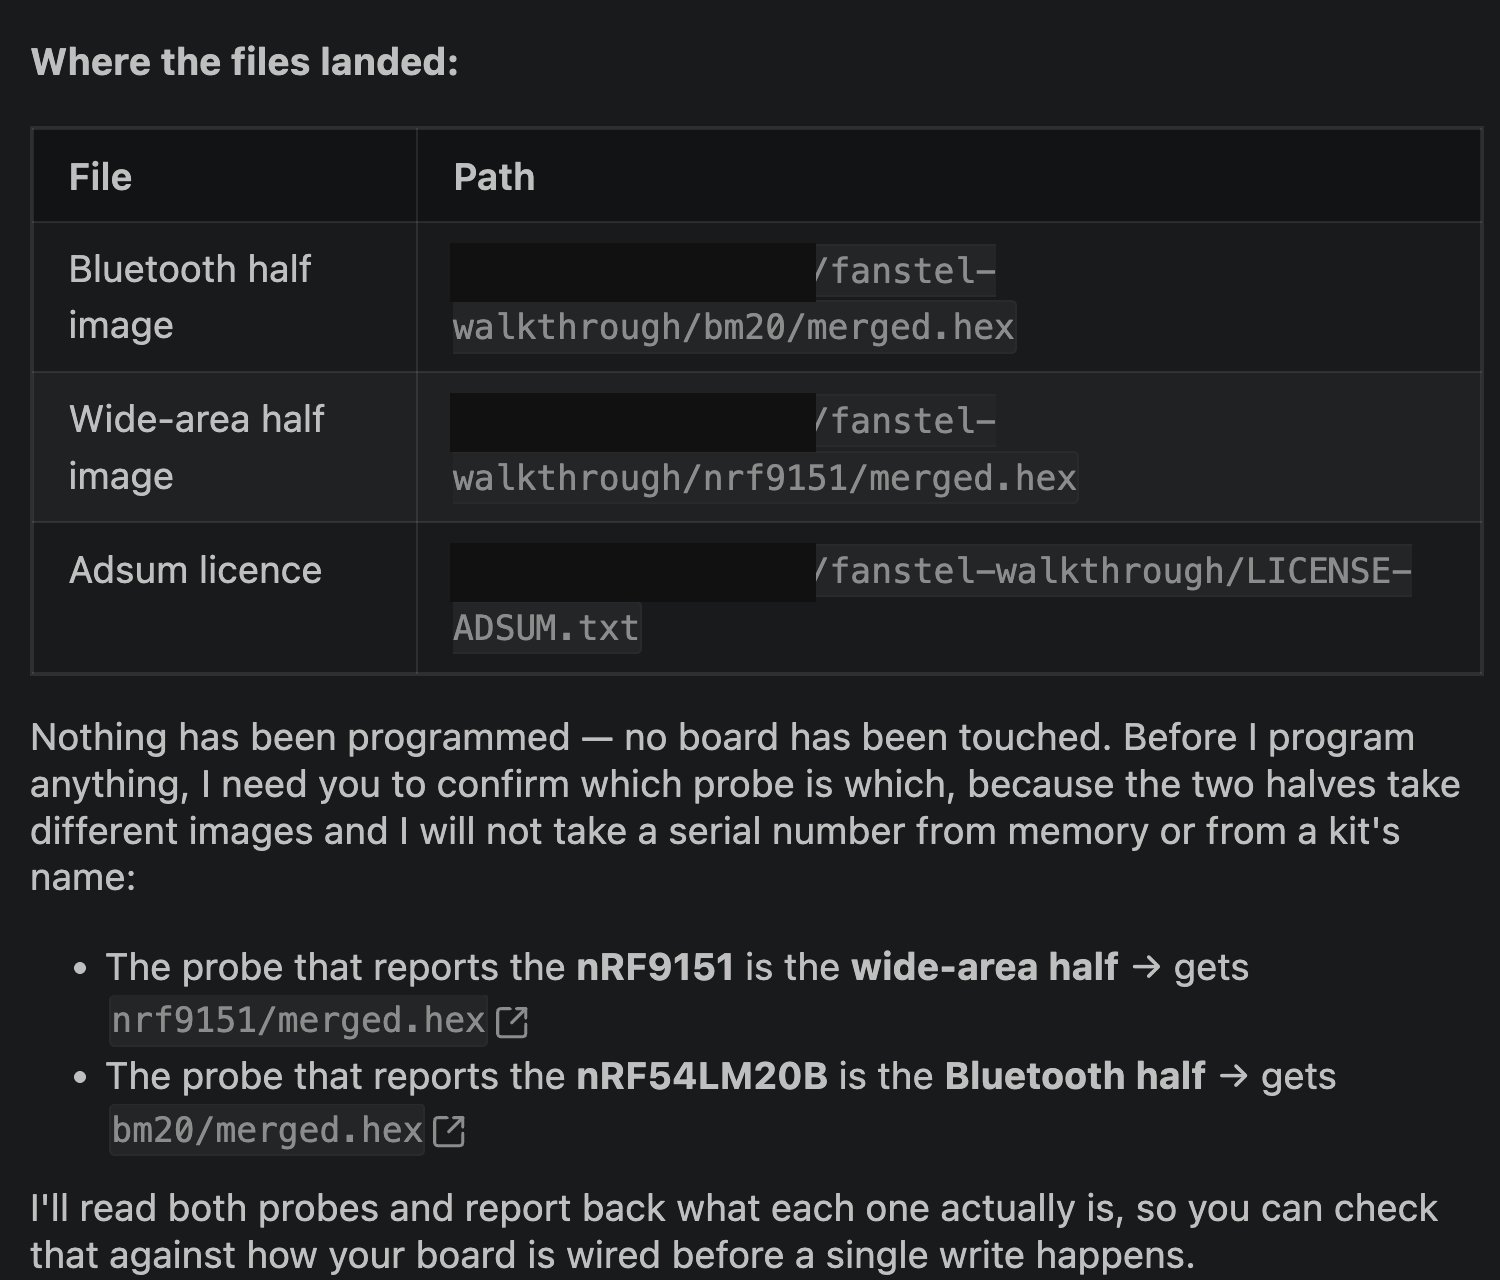
The files in your project: bm20/merged.hex, nrf9151/merged.hex and the licence.
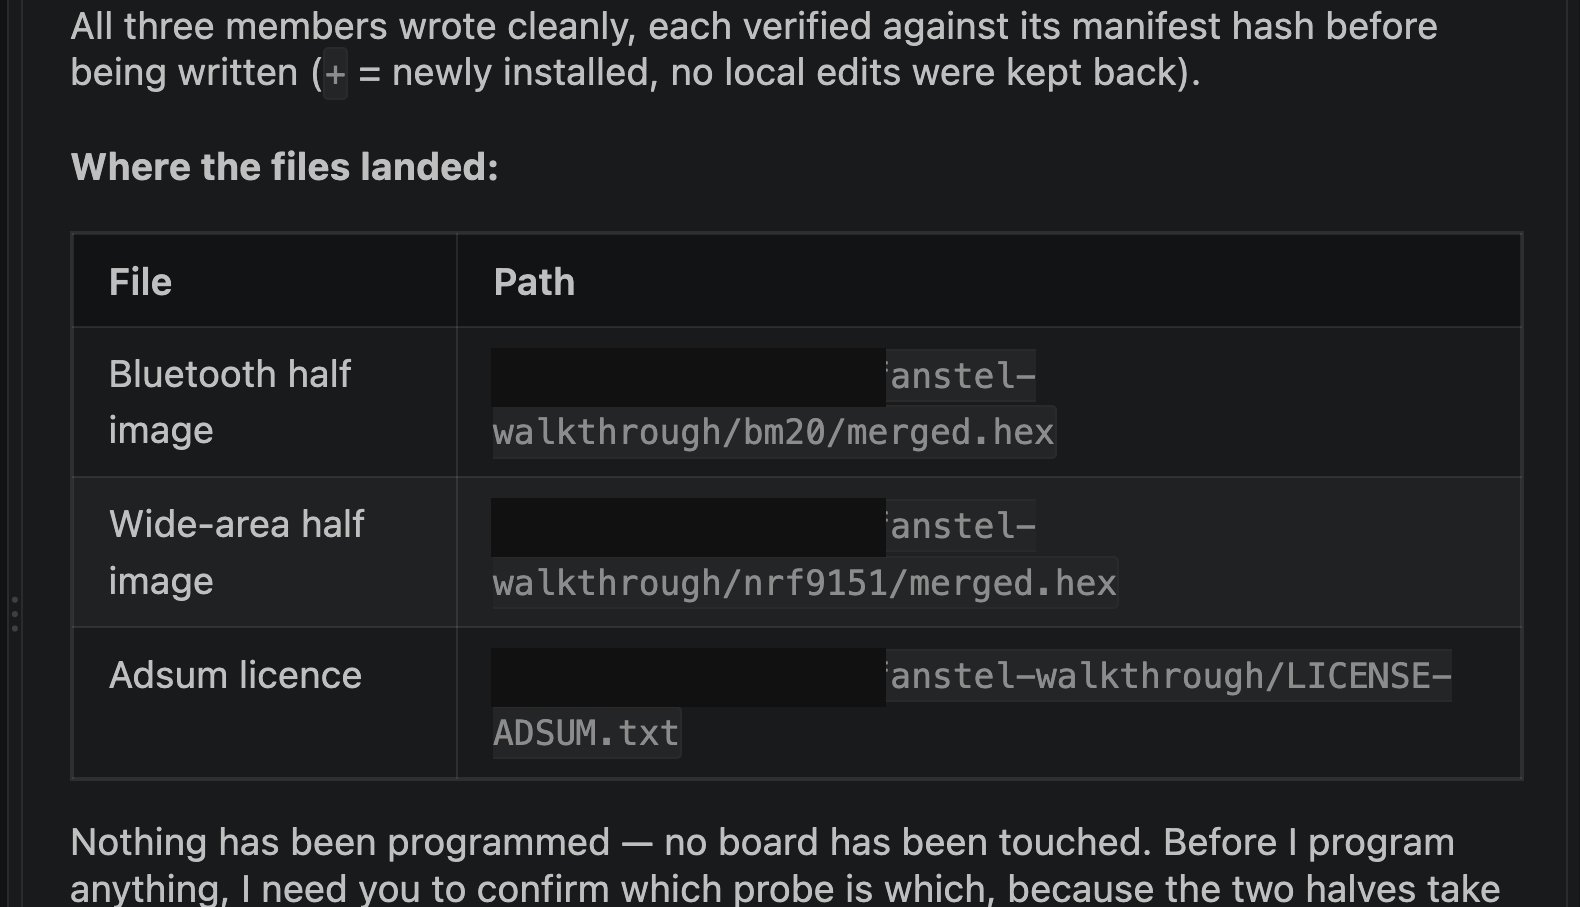
Three files: one image per half, plus the licence. Each image carries both a bootloader and an application, so a board straight from the box comes up from this pair alone. Nothing has been programmed yet.
Step 2: Flash both halves
about 5 minutes Two chips, two images, and they must not be swapped. Take the probe serial numbers from the tool’s own list, never from the kit’s name or the header’s label.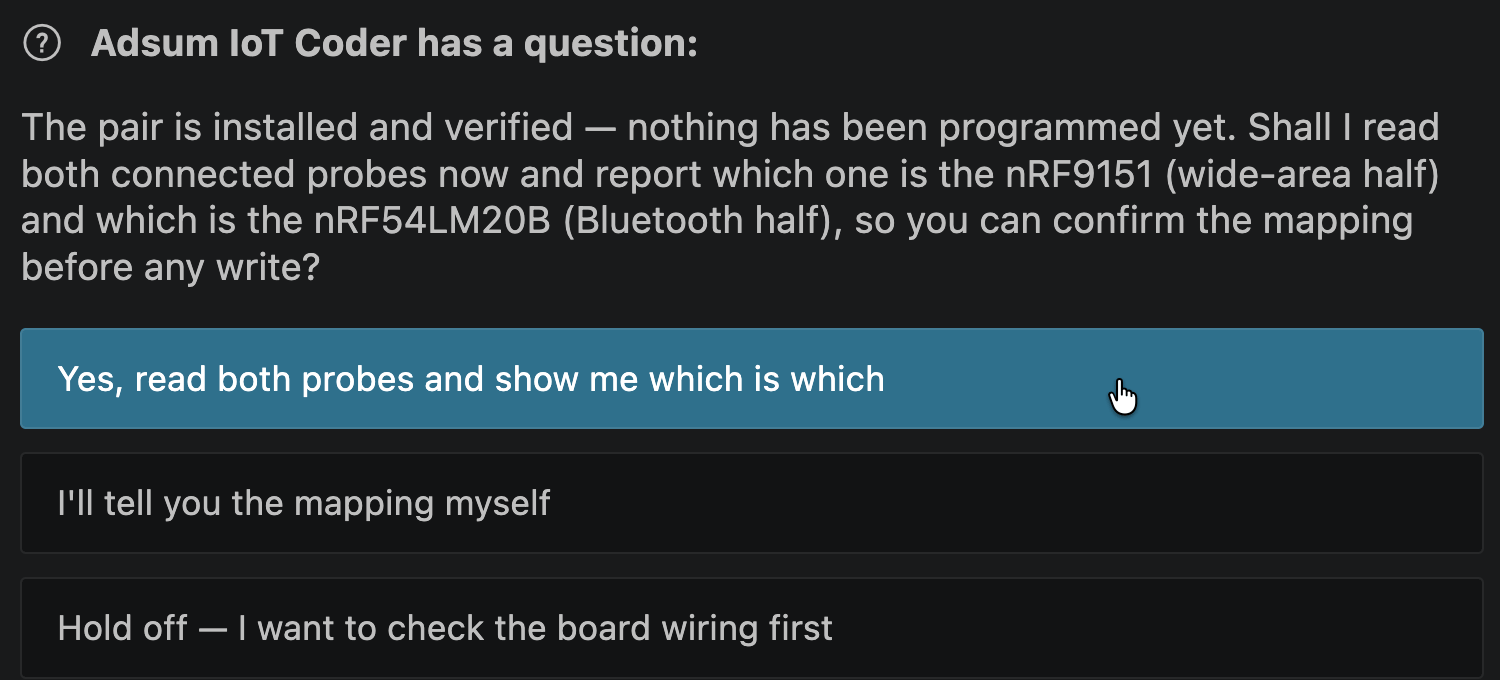
Before any write, each probe is asked what it actually reaches.
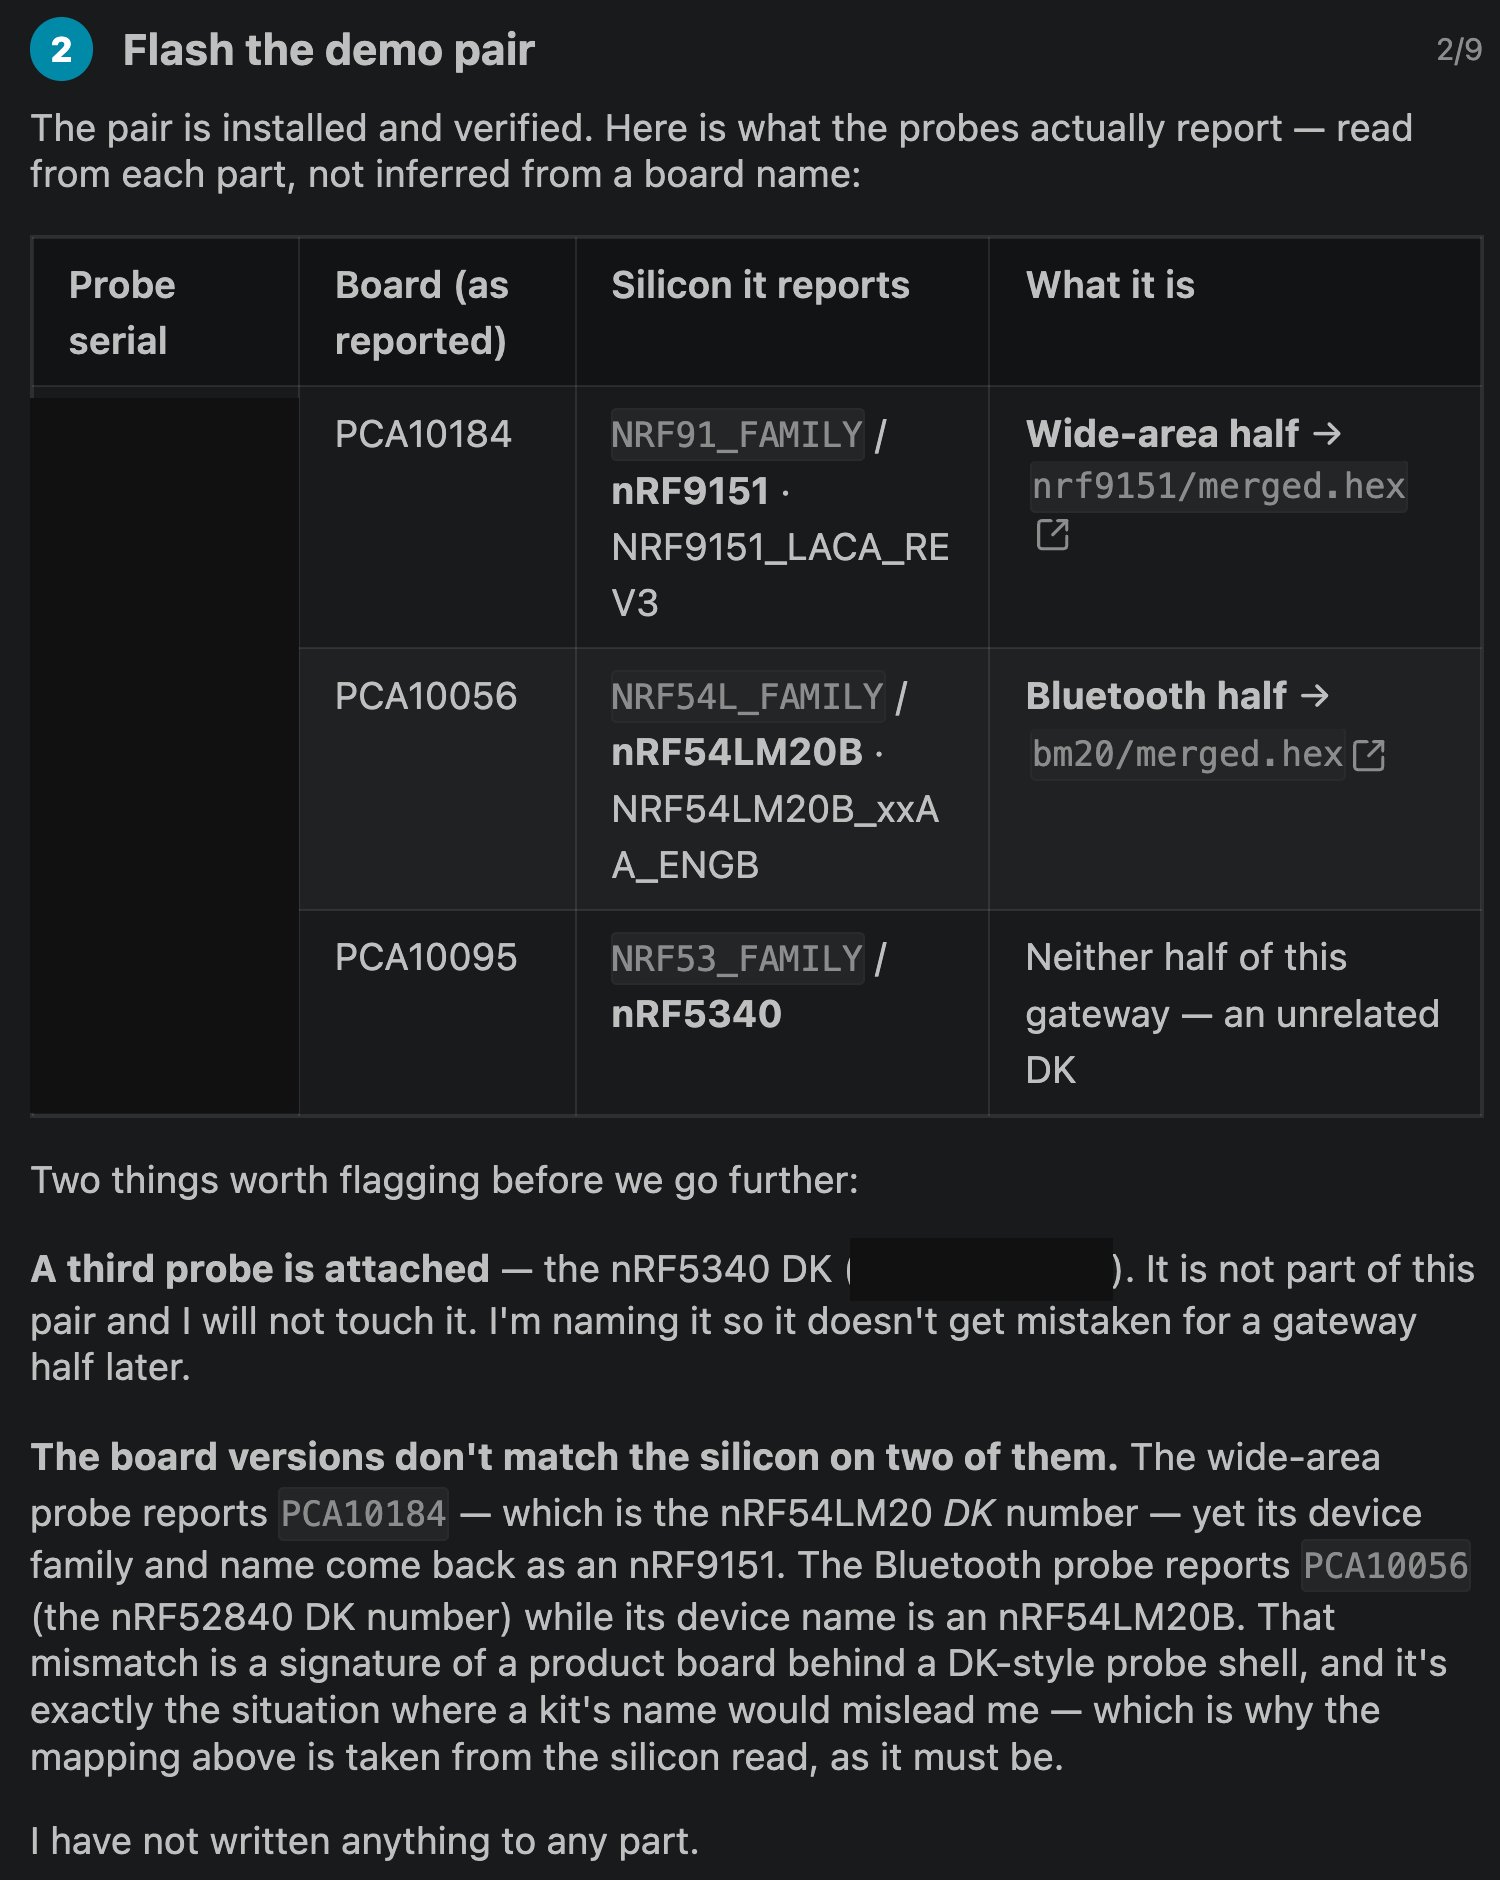
The mapping, confirmed against your board's wiring before a single byte is written. Note the third probe: present, but not part of this gateway.
The wide-area half: three commands, one session, nothing in between


The one sequence to get right. Run all three in one session with nothing in between. If the write is refused once, run it again before anything else.
reset=RESET_NONE, then reset.
Step 3: Commission the unit
about 10 minutes Commissioning gives the unit its place, its name and key, its network, its platform and its sensors. It happens over Bluetooth, in one of two places: Adsum IoT Coder, at your desk, or a browser, on an installer’s phone at the site. Both write the same settings with the same checks, and everything written is read back from the unit’s own account of itself. Nothing is trusted because a button was pressed.From Adsum IoT Coder
From 0.5.1, the Hardware page in Adsum IoT Coder lists the units it hears under Gateways in range and takes each one through four steps: pair, claim it for this computer, check its firmware, commission it. Commission it opens a session. The agent reads what the unit already holds and asks one question at a time for what it cannot read: where the unit is, its name, the Wi-Fi, the mobile network and its class, the platform. It writes each setting, reads it back, starts the unit and checks that it is working, then goes on to the sensors the unit should admit.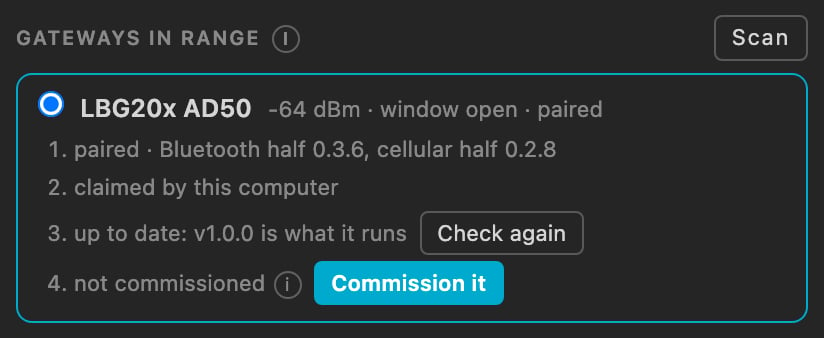
An LBG20x in range: paired, claimed by this computer, its firmware current, not commissioned yet. A BLG20x takes the same four steps.
- The key is shown once. The session also adds it to
adsum-fleet-register.csvin your workspace, with the unit’s name and identity. Keep that file: it is the only place the key exists. - The answers that repeat are kept. A site profile,
adsum-site.jsonin the workspace, holds the naming pattern, the network, the platform and the Wi-Fi name, so the next unit needs only its position, the Wi-Fi passphrase and the platform’s token. It never holds a password, a token or a key; those are asked each time. - A commissioned unit says how it is doing. The fourth step then reads commissioned with the unit’s own verdict (working, not working yet, still checking), its (i) holds the position, how it sends and where, and Change… opens a session to change any of it.
- A claimed unit is updated from this computer. Claiming locks the unit’s service port to this computer’s key. The browser page still commissions it, and points here for its firmware.
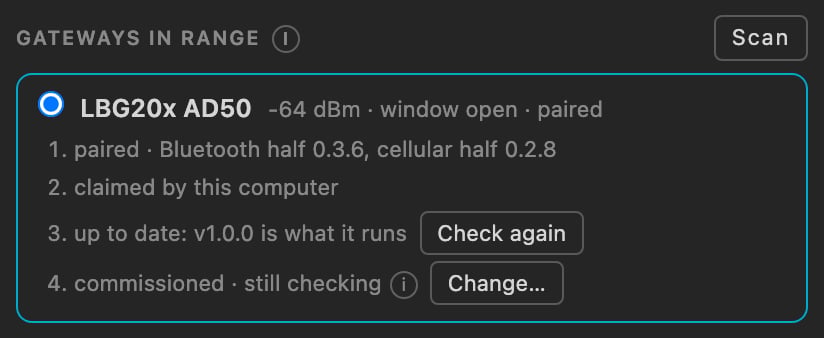
Commissioned, in the unit's own words: still checking its first send. The (i) holds the position, how it sends and where, and the commissioning window.
From a browser
The NTN-GW Commissioner, at commission.adsumnetworks.com/ntn-gw/, does the same in Chrome over Web Bluetooth, for an installer with a phone or a laptop. Nothing is installed and nothing is served from your machine.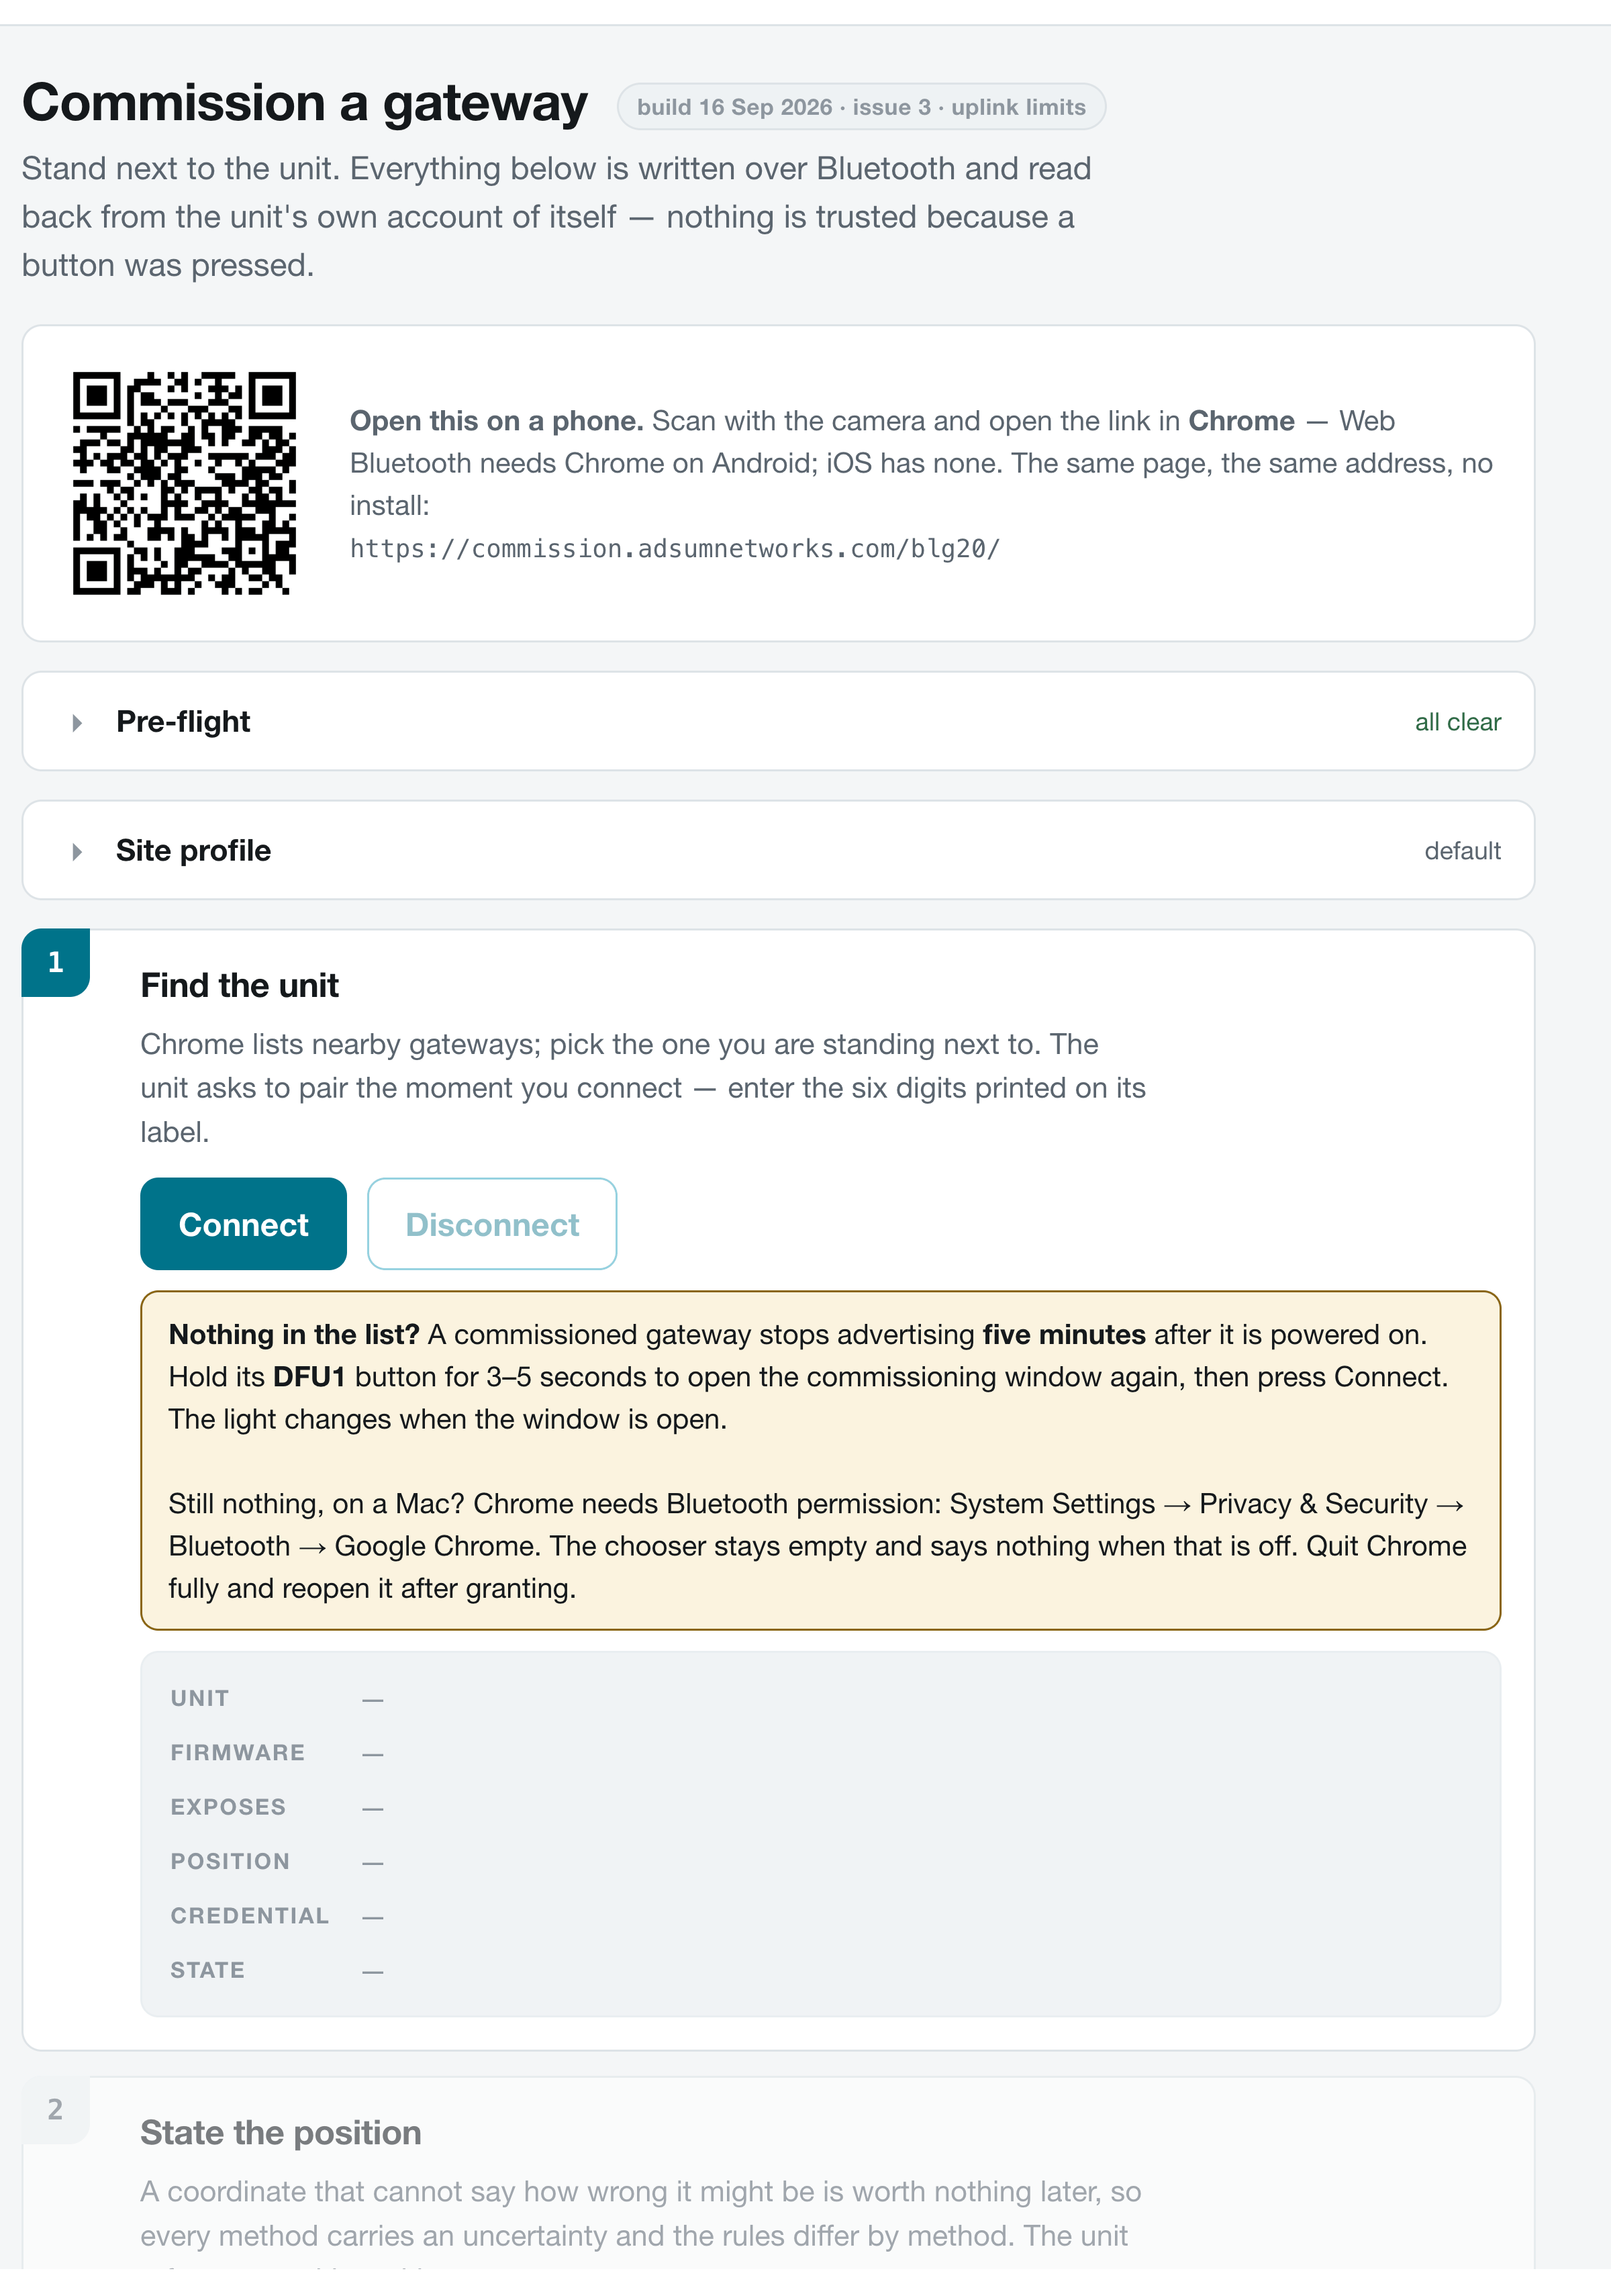
The page at rest. Stand next to the unit. The QR code opens the same page on an Android phone.
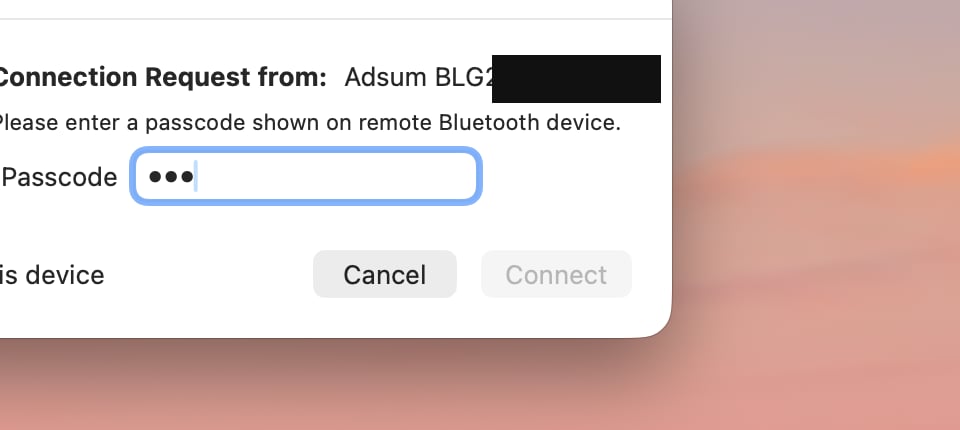
The pairing dialog belongs to the operating system, not the browser, so it can open behind the window. The page shows the six digits first, so you always know which unit you are answering for.
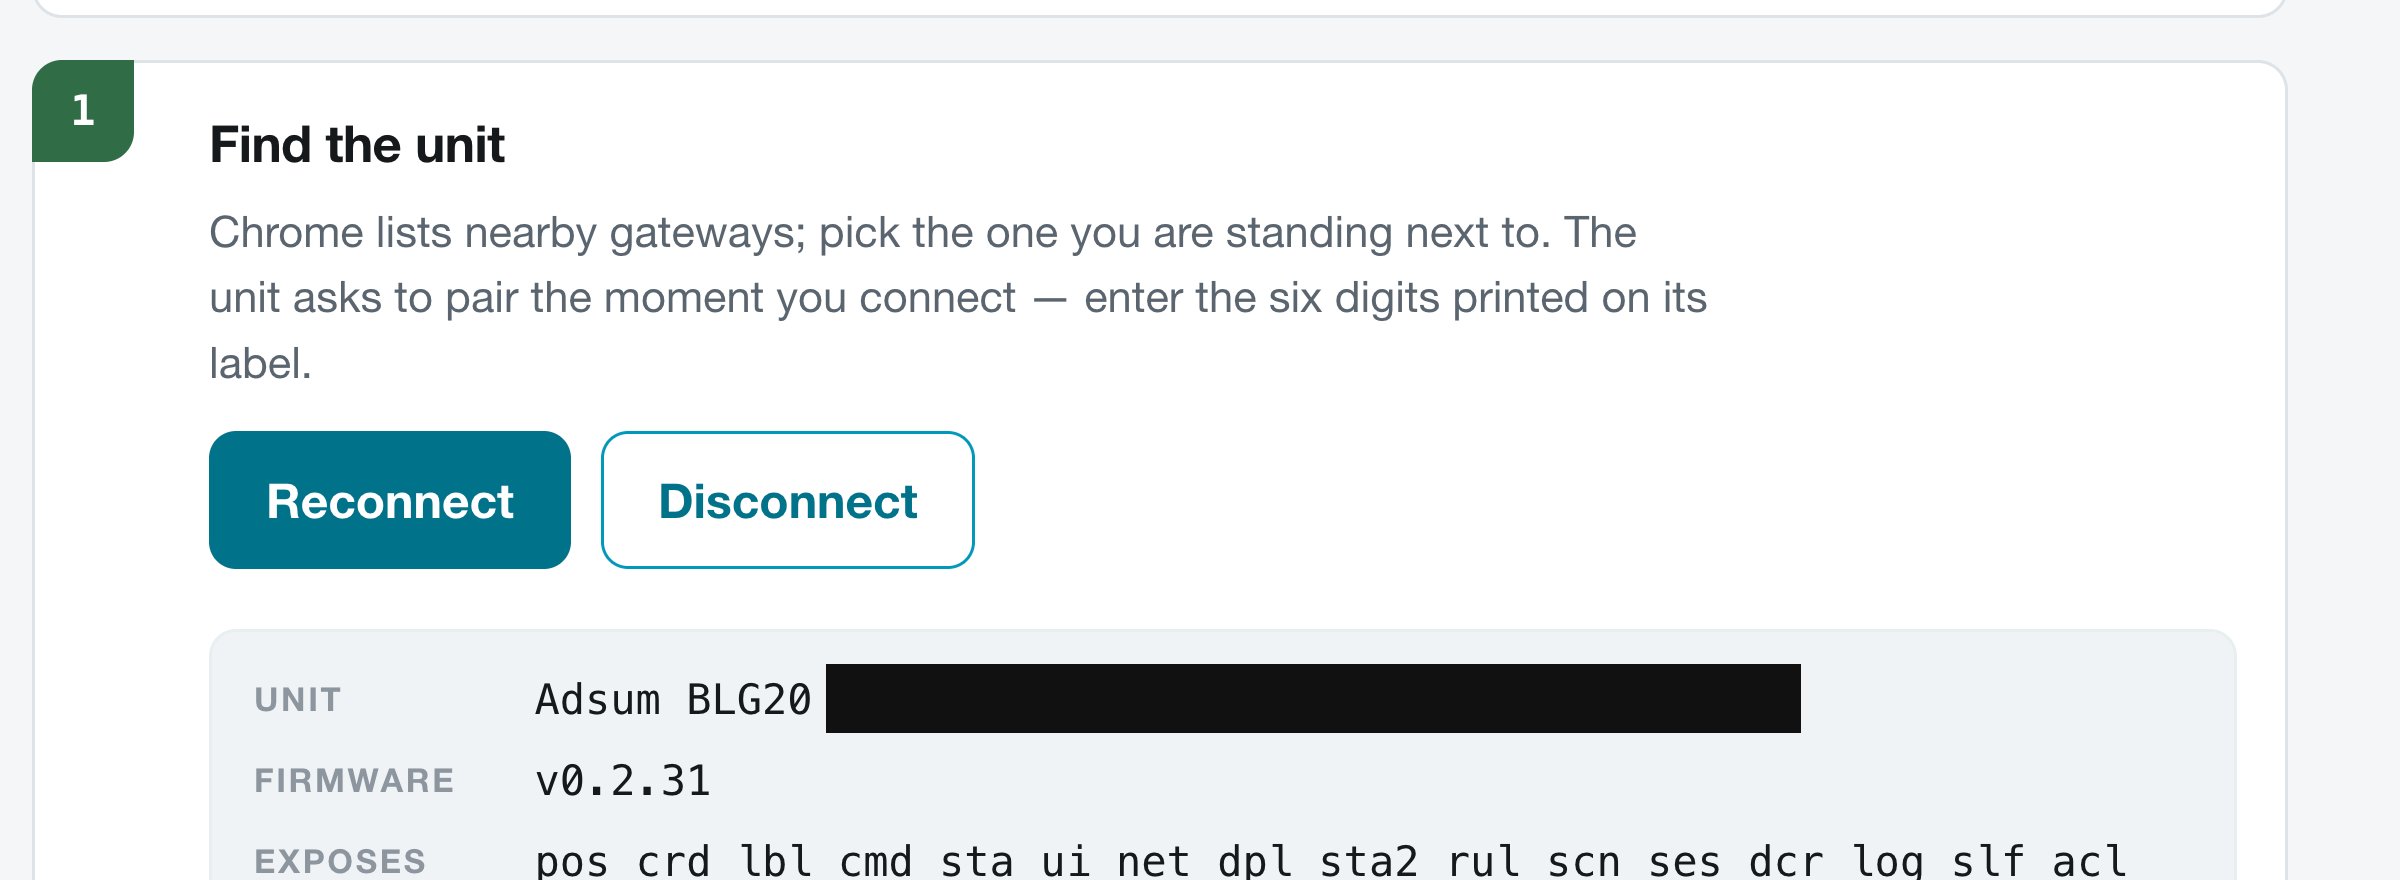
Connected. What the unit says it is, before you change anything.
Position, name, credential
The board has no GNSS receiver, so the position is written here and is permanent until the unit is re-commissioned. Every method carries an uncertainty and the unit refuses a position without one: a coordinate that cannot say how wrong it might be is worth nothing later.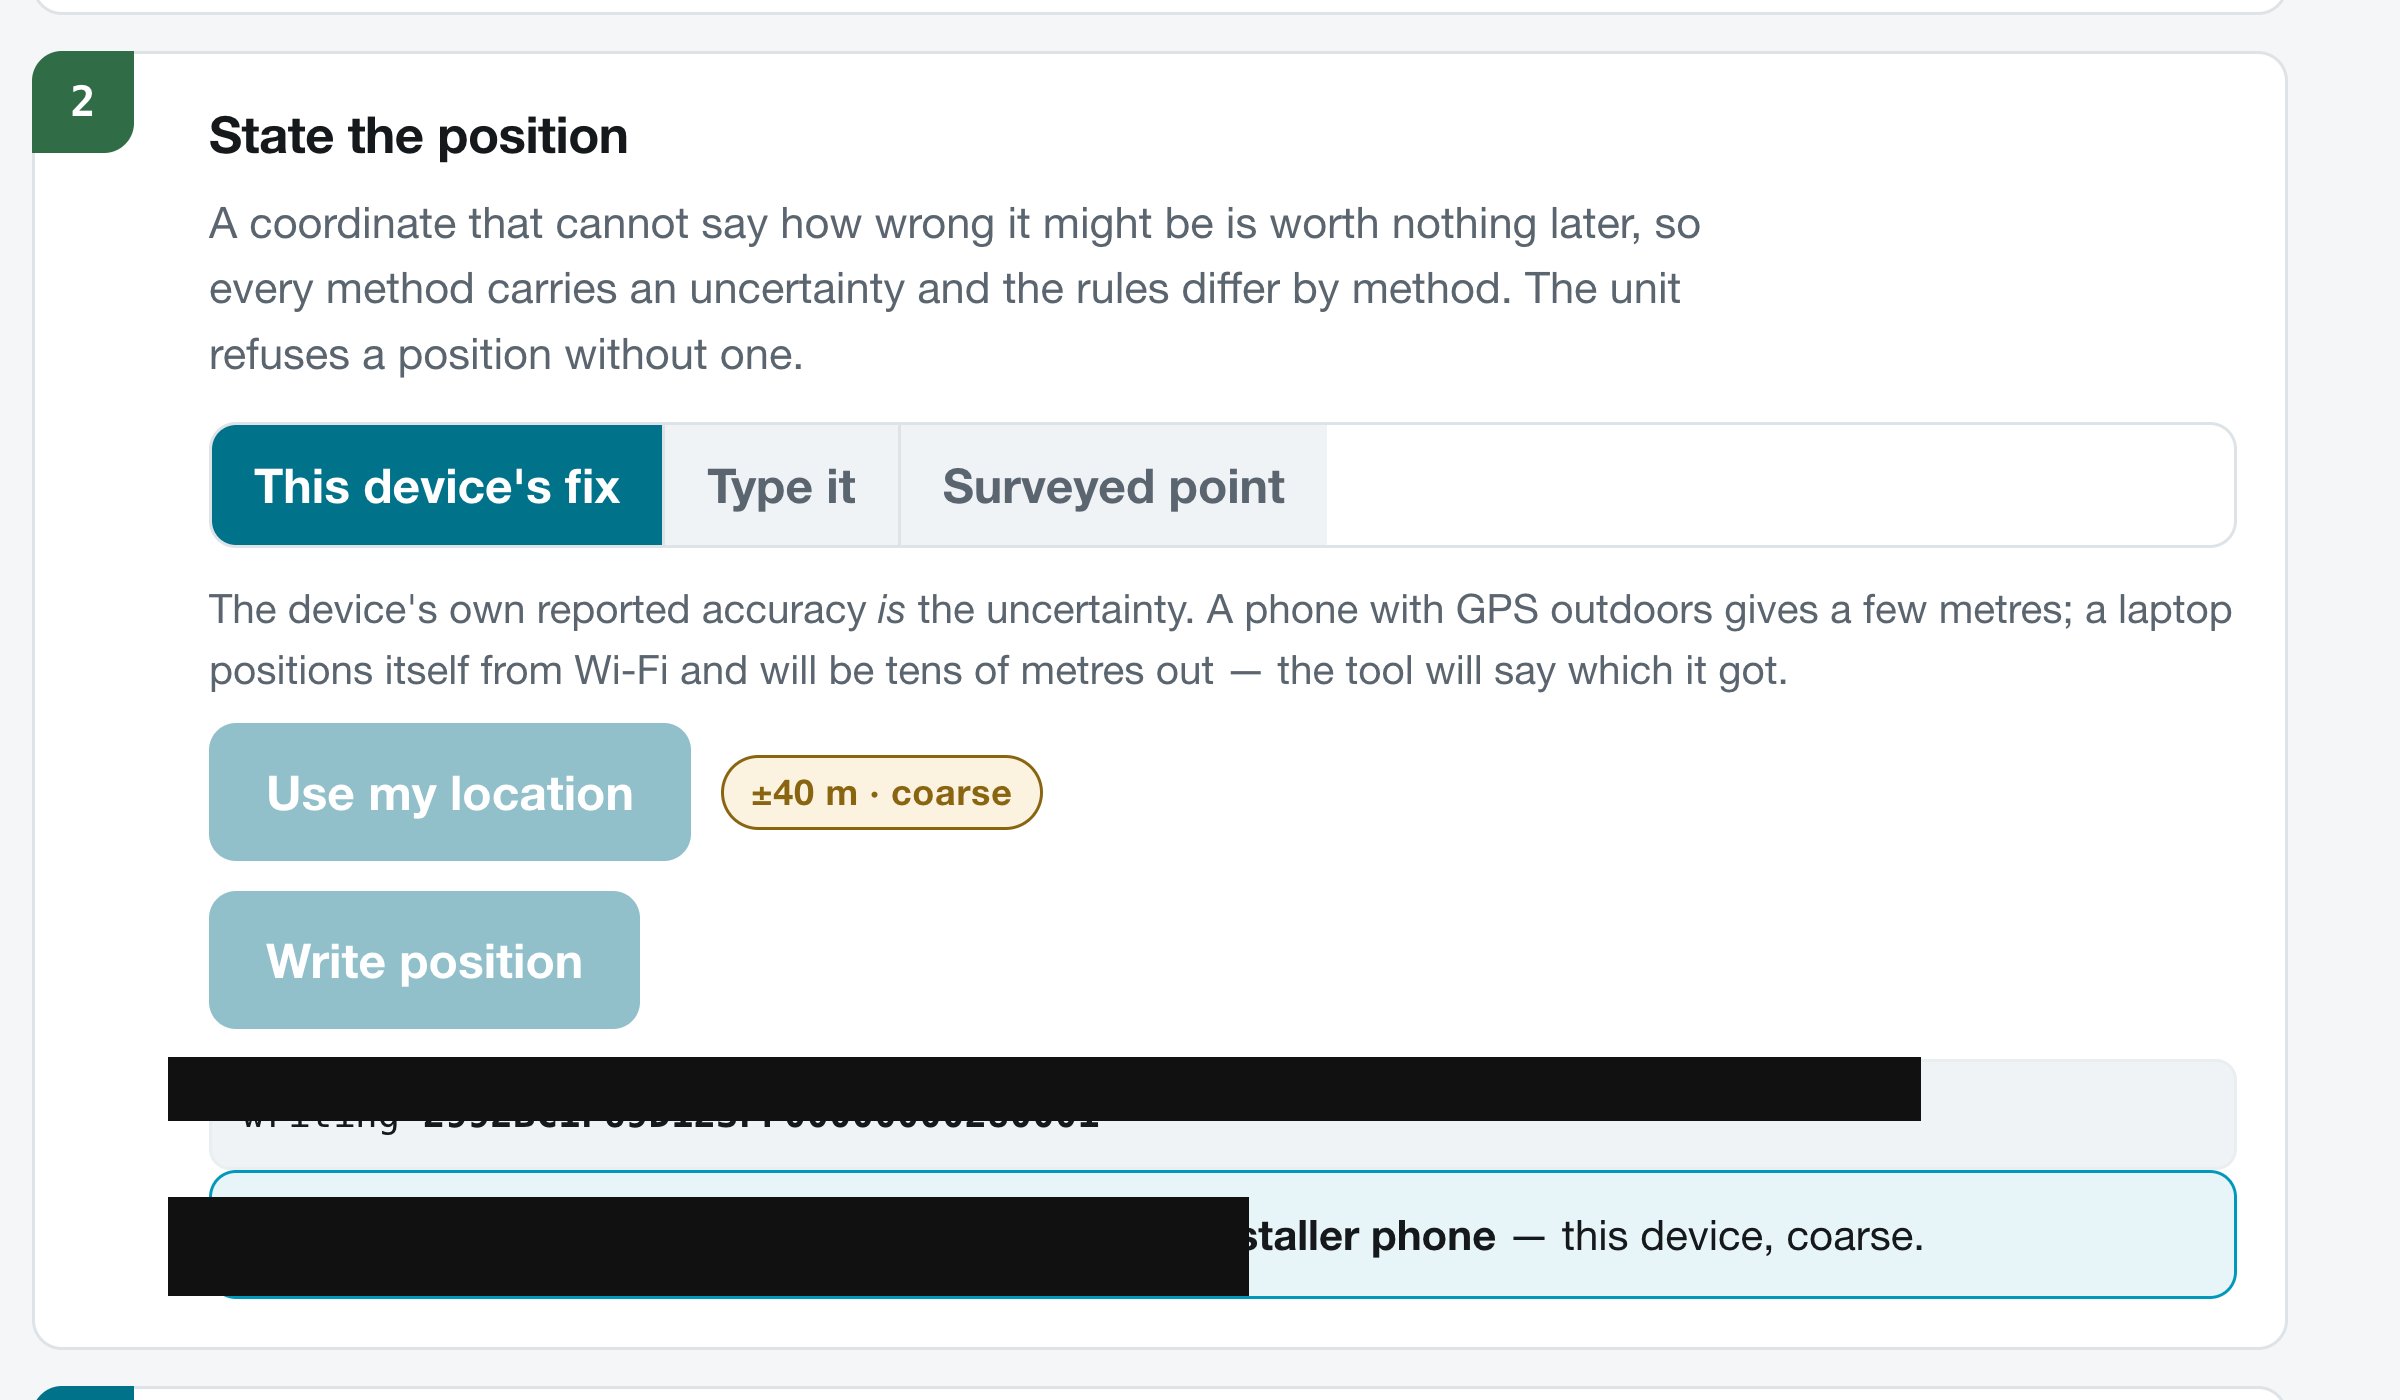
Written, then read straight back. The coordinates are masked in this guide only; on your unit they appear in full.
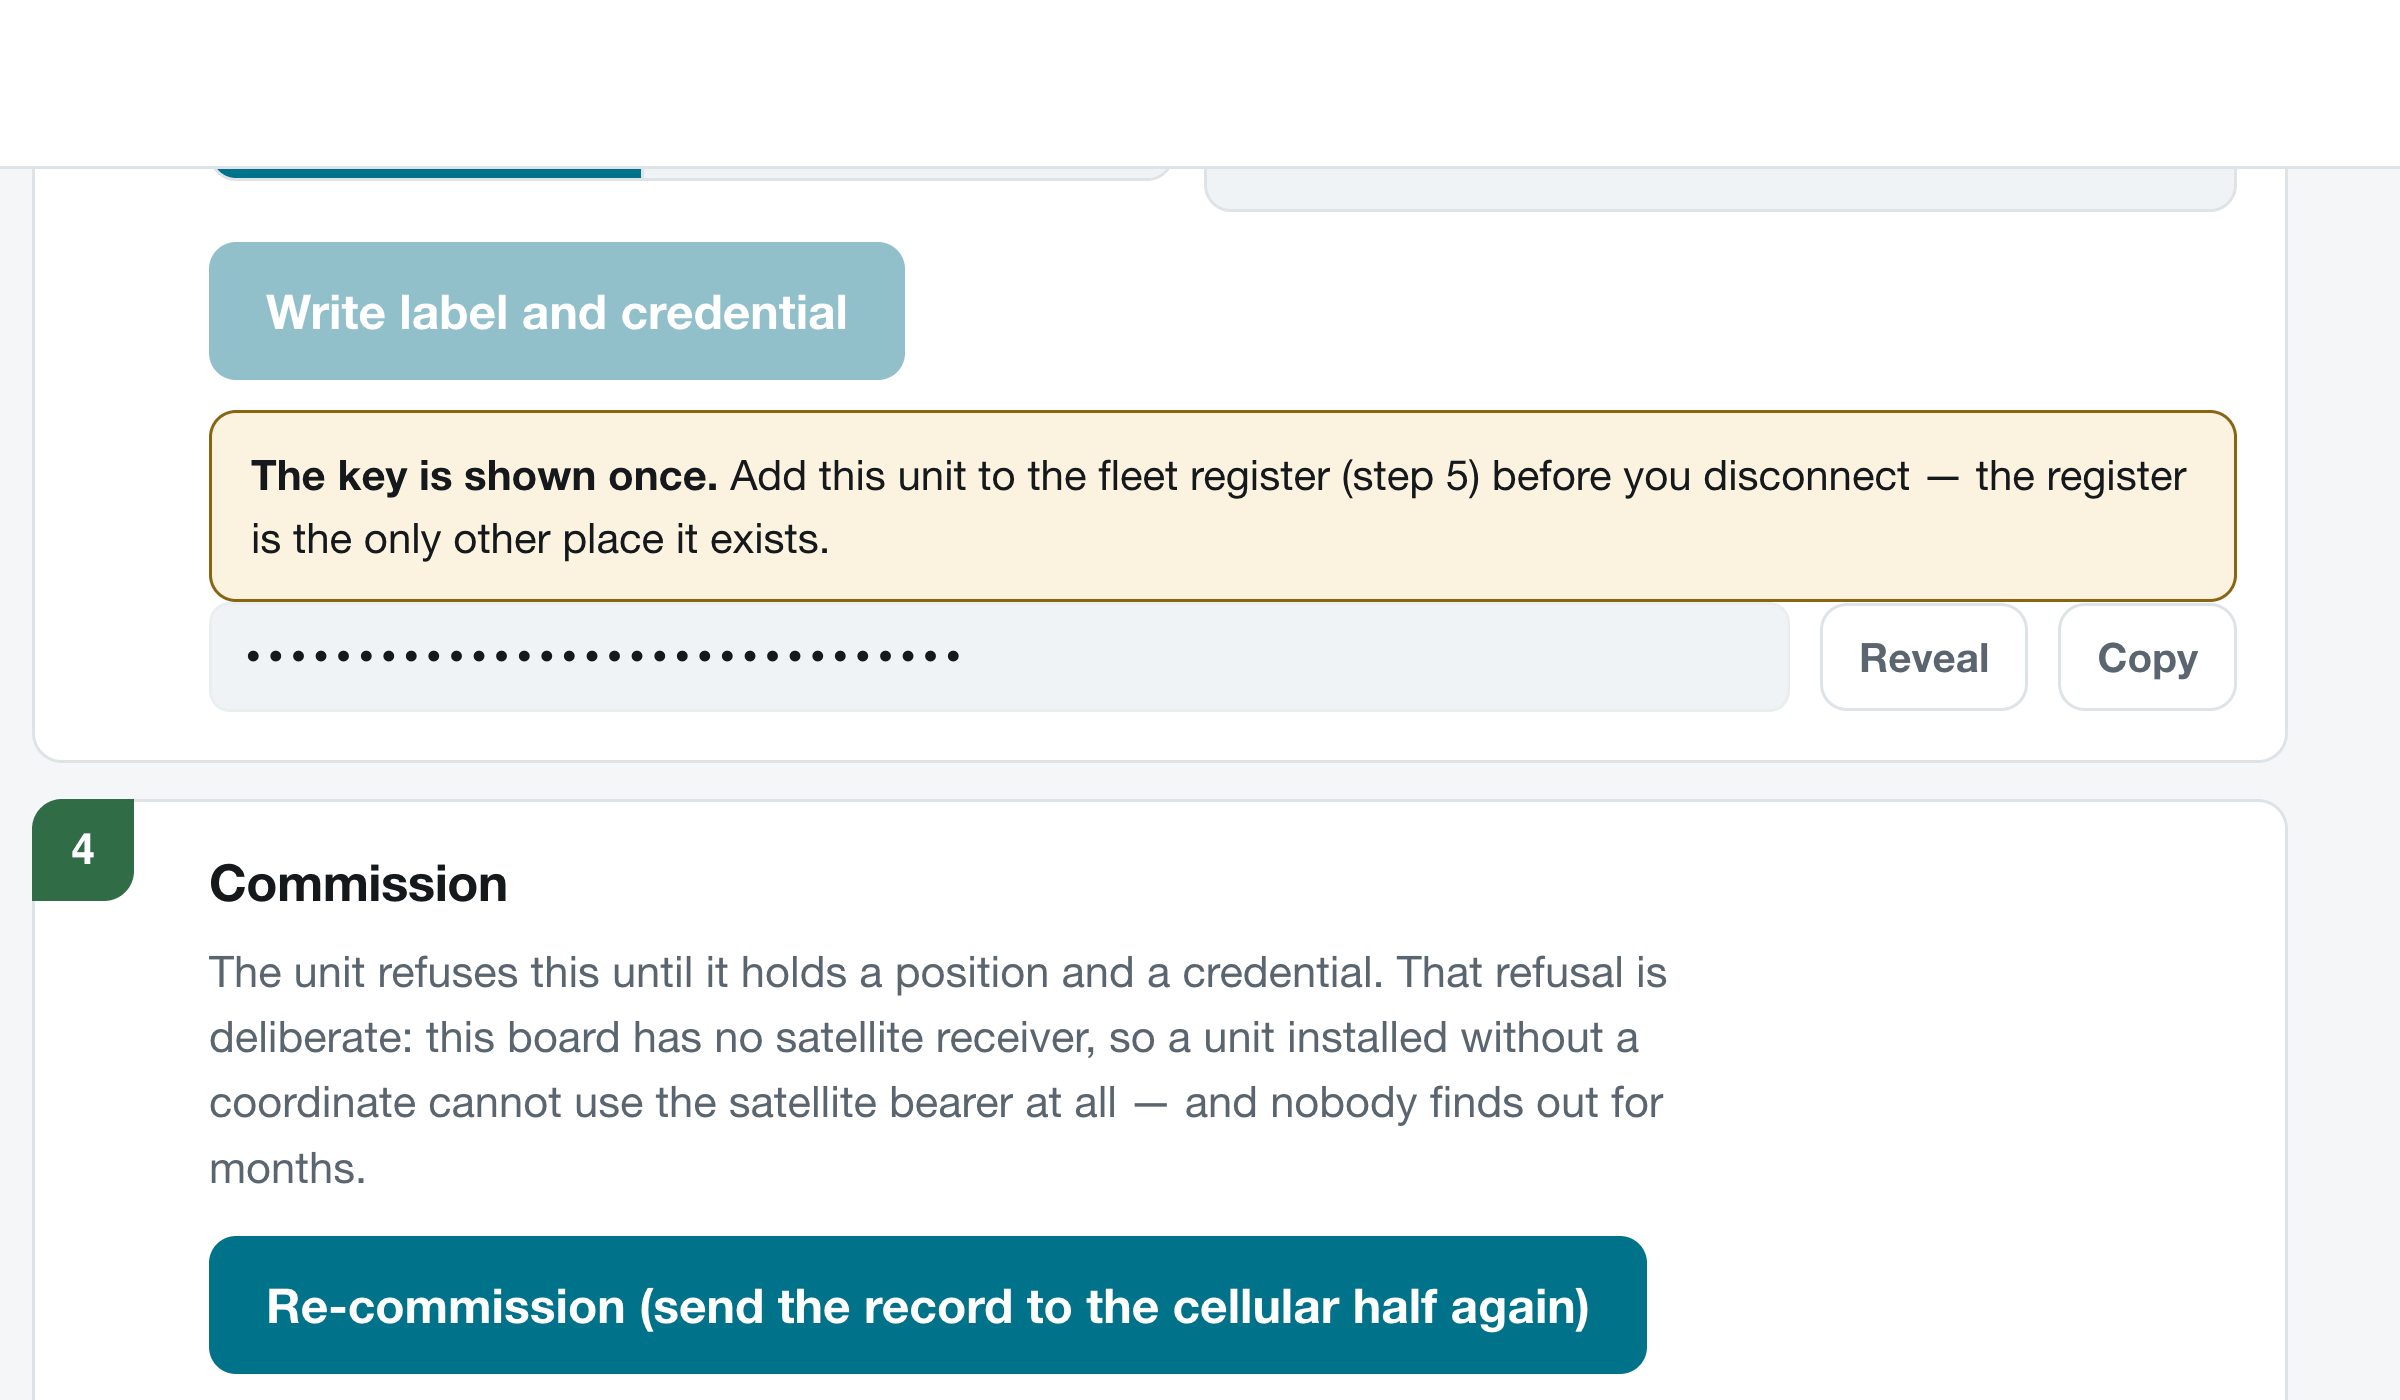
The credential is shown once. Add the unit to the fleet register before you disconnect: the register is the only place that key exists.
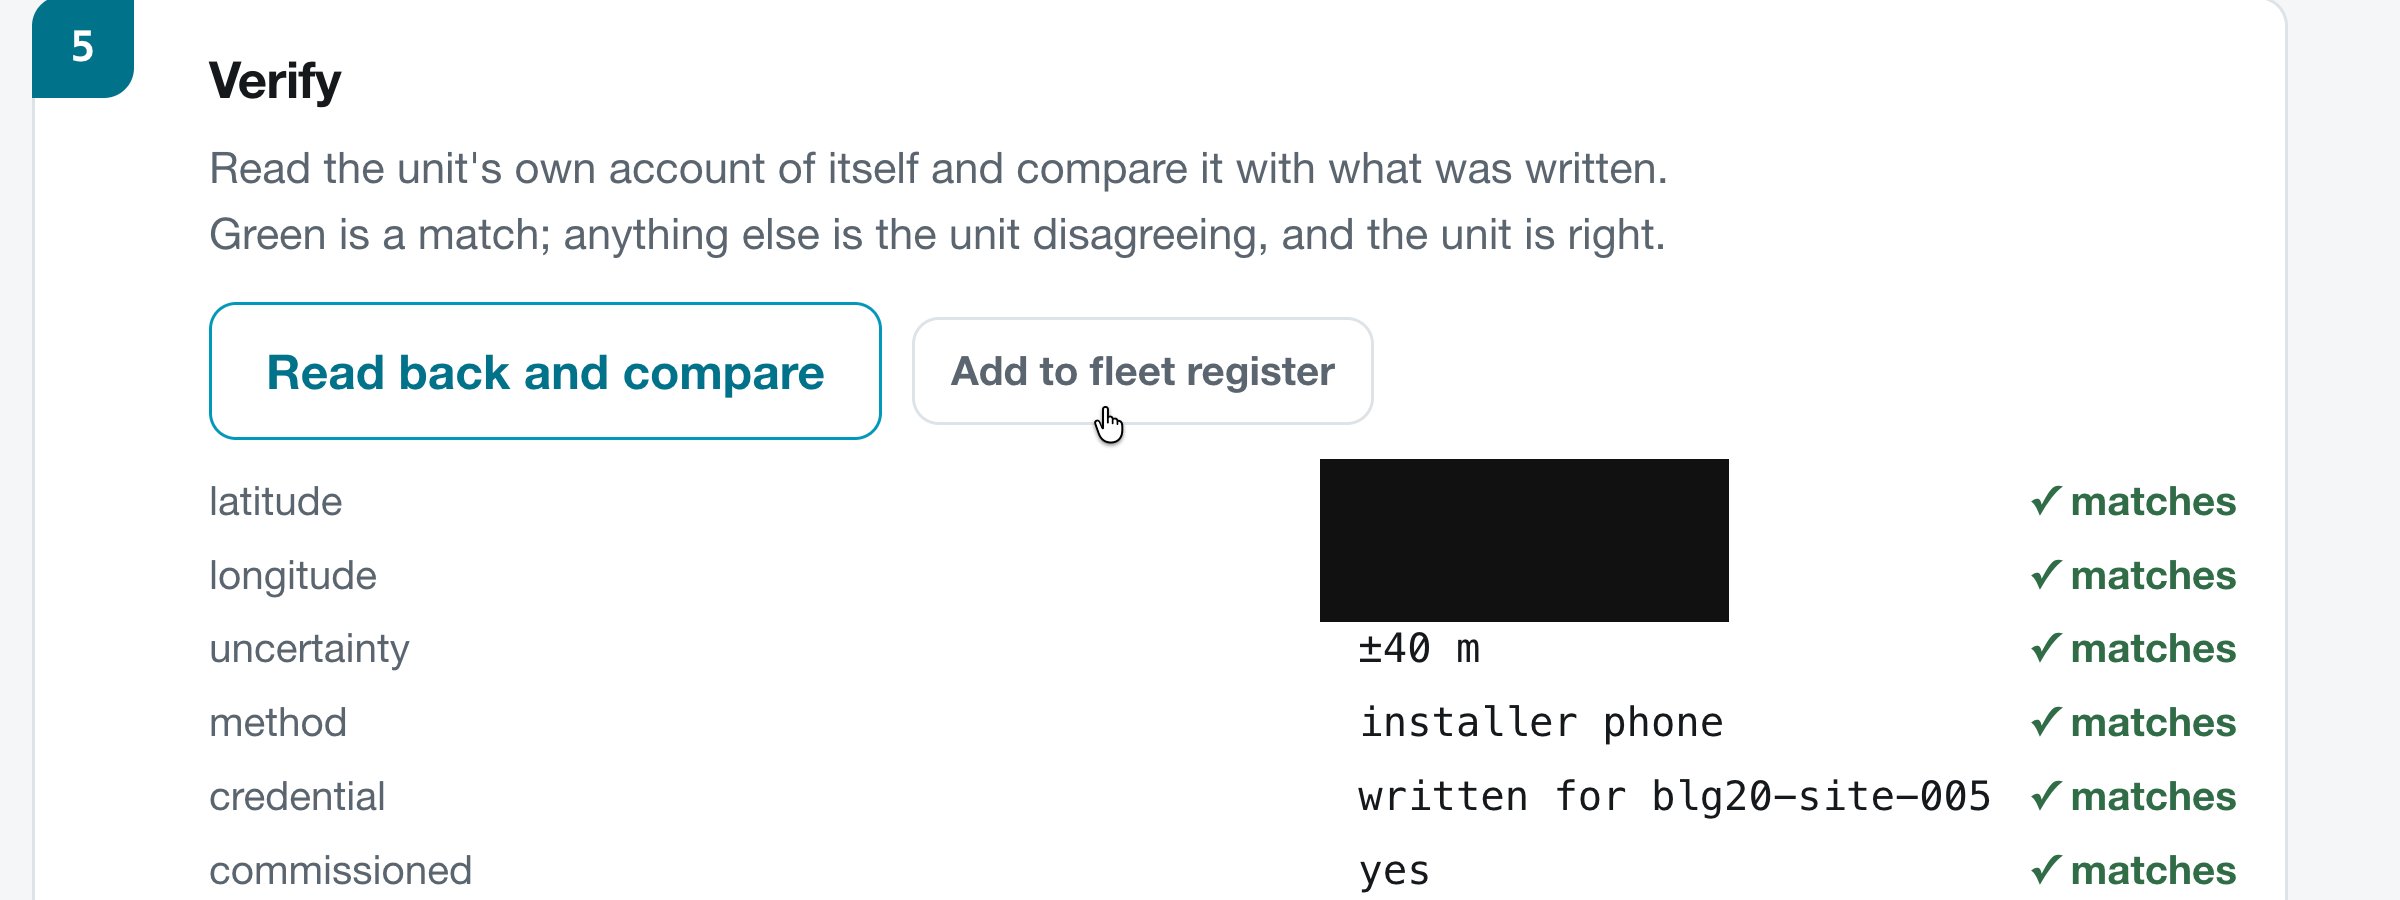
The gate for this step: every field read back and compared. Green is a match; anything else is the unit disagreeing, and the unit is right.
Step 4: Set the deployment class
about 5 minutes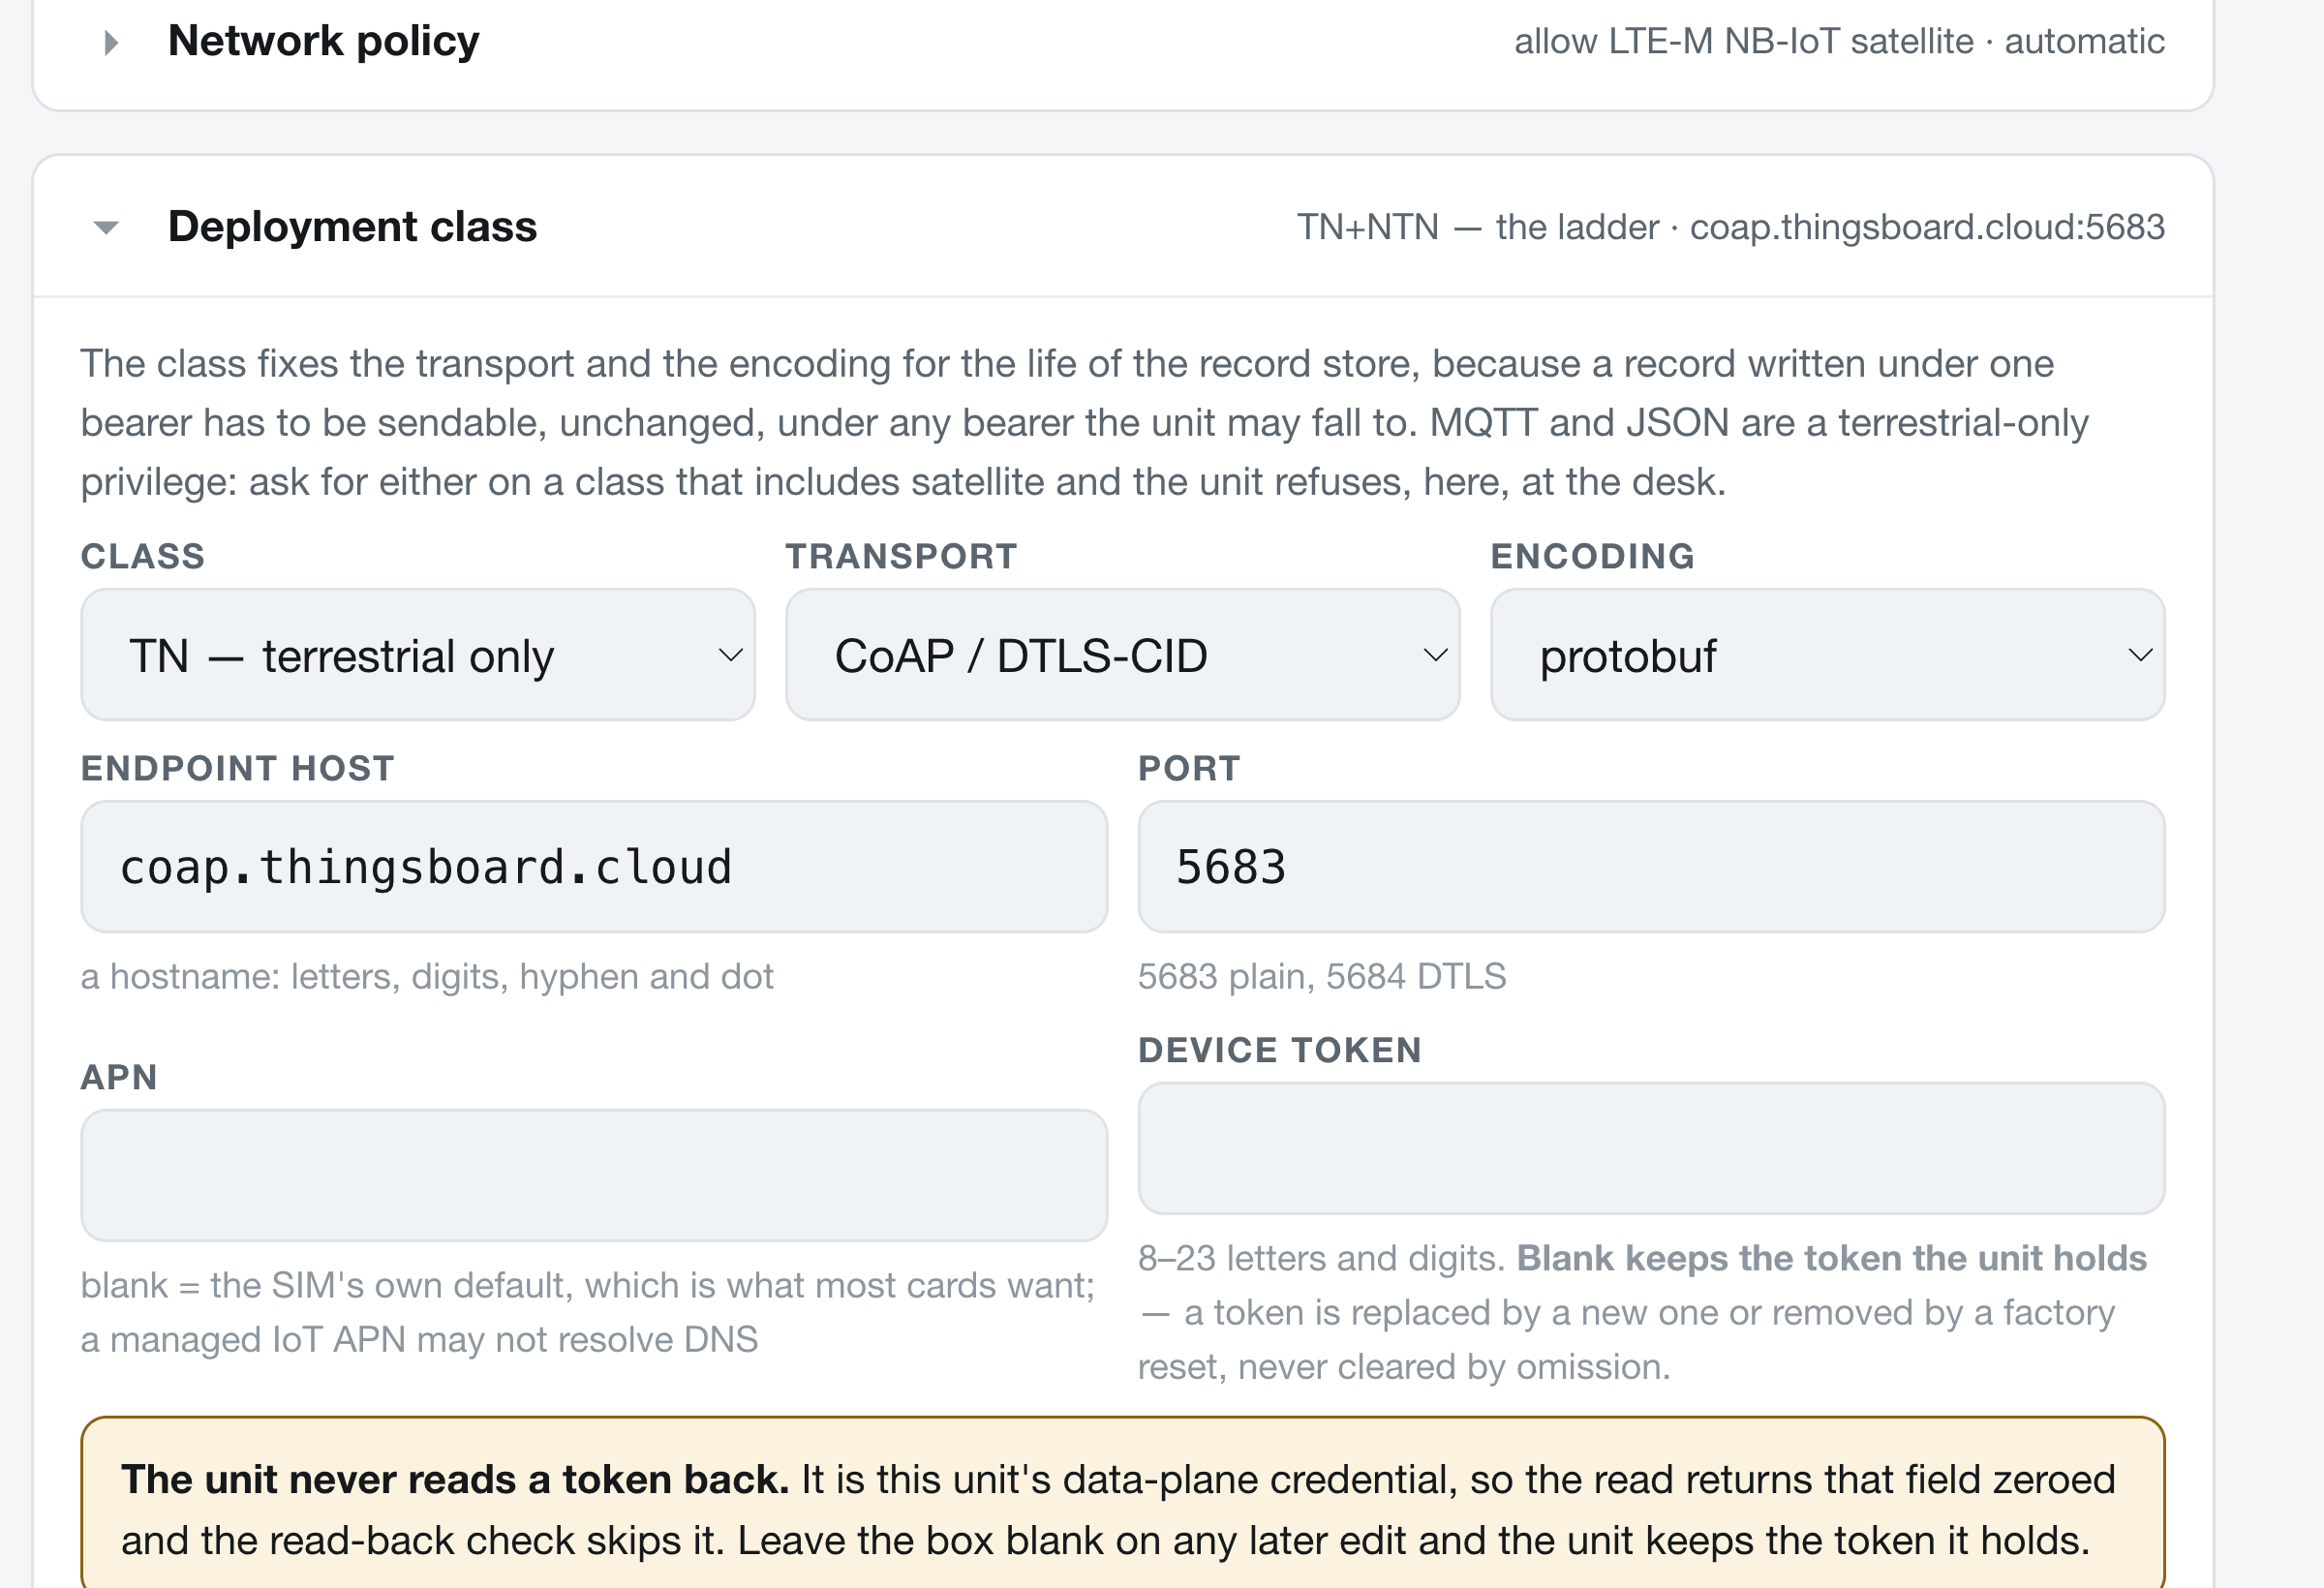
The Deployment class panel, below Verify on the same page. Re-commissioning is not the way to change a class; this panel is.
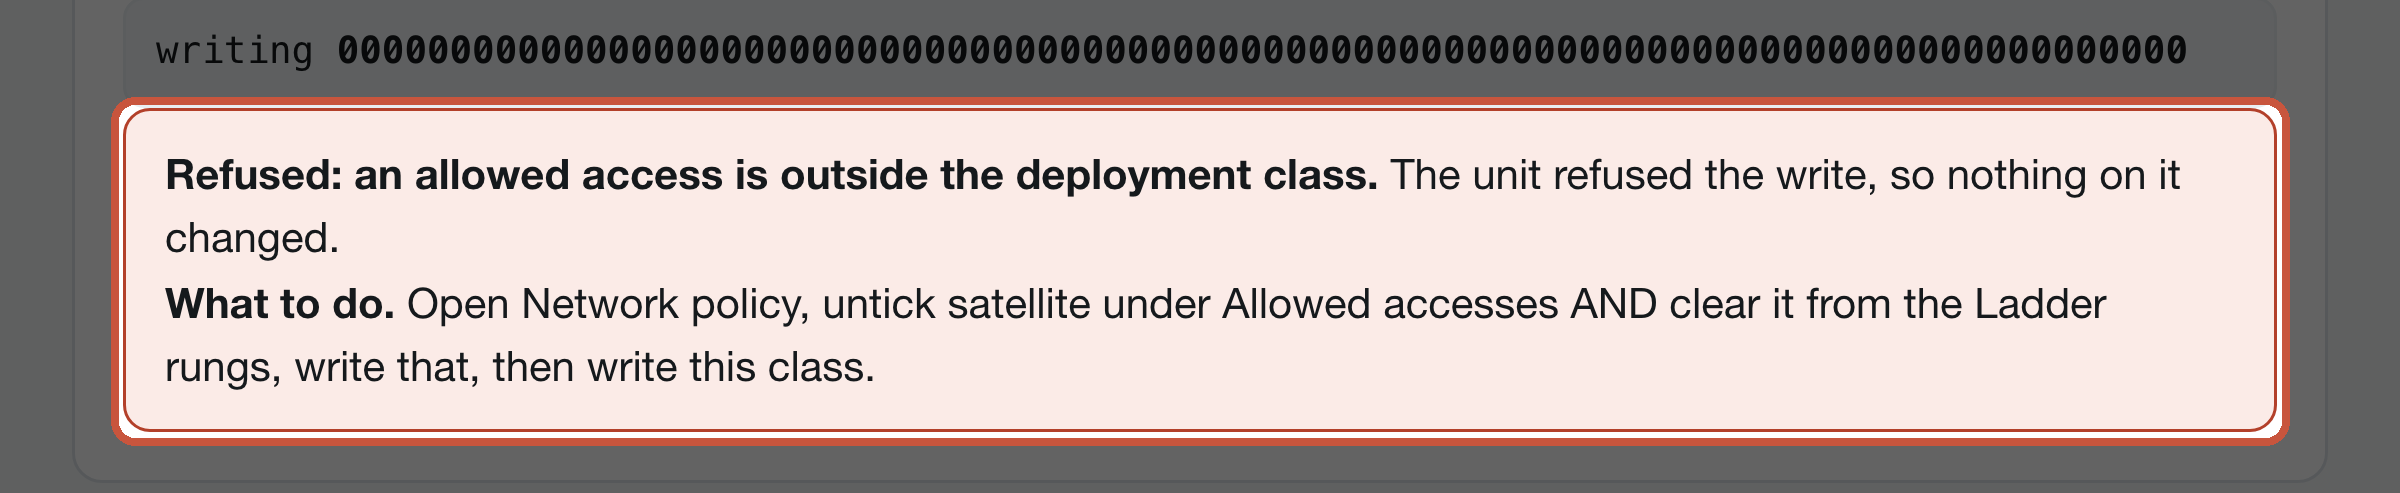
What the wrong order looks like. The unit refuses the write and names both the reason and what to do; nothing on the unit changed.
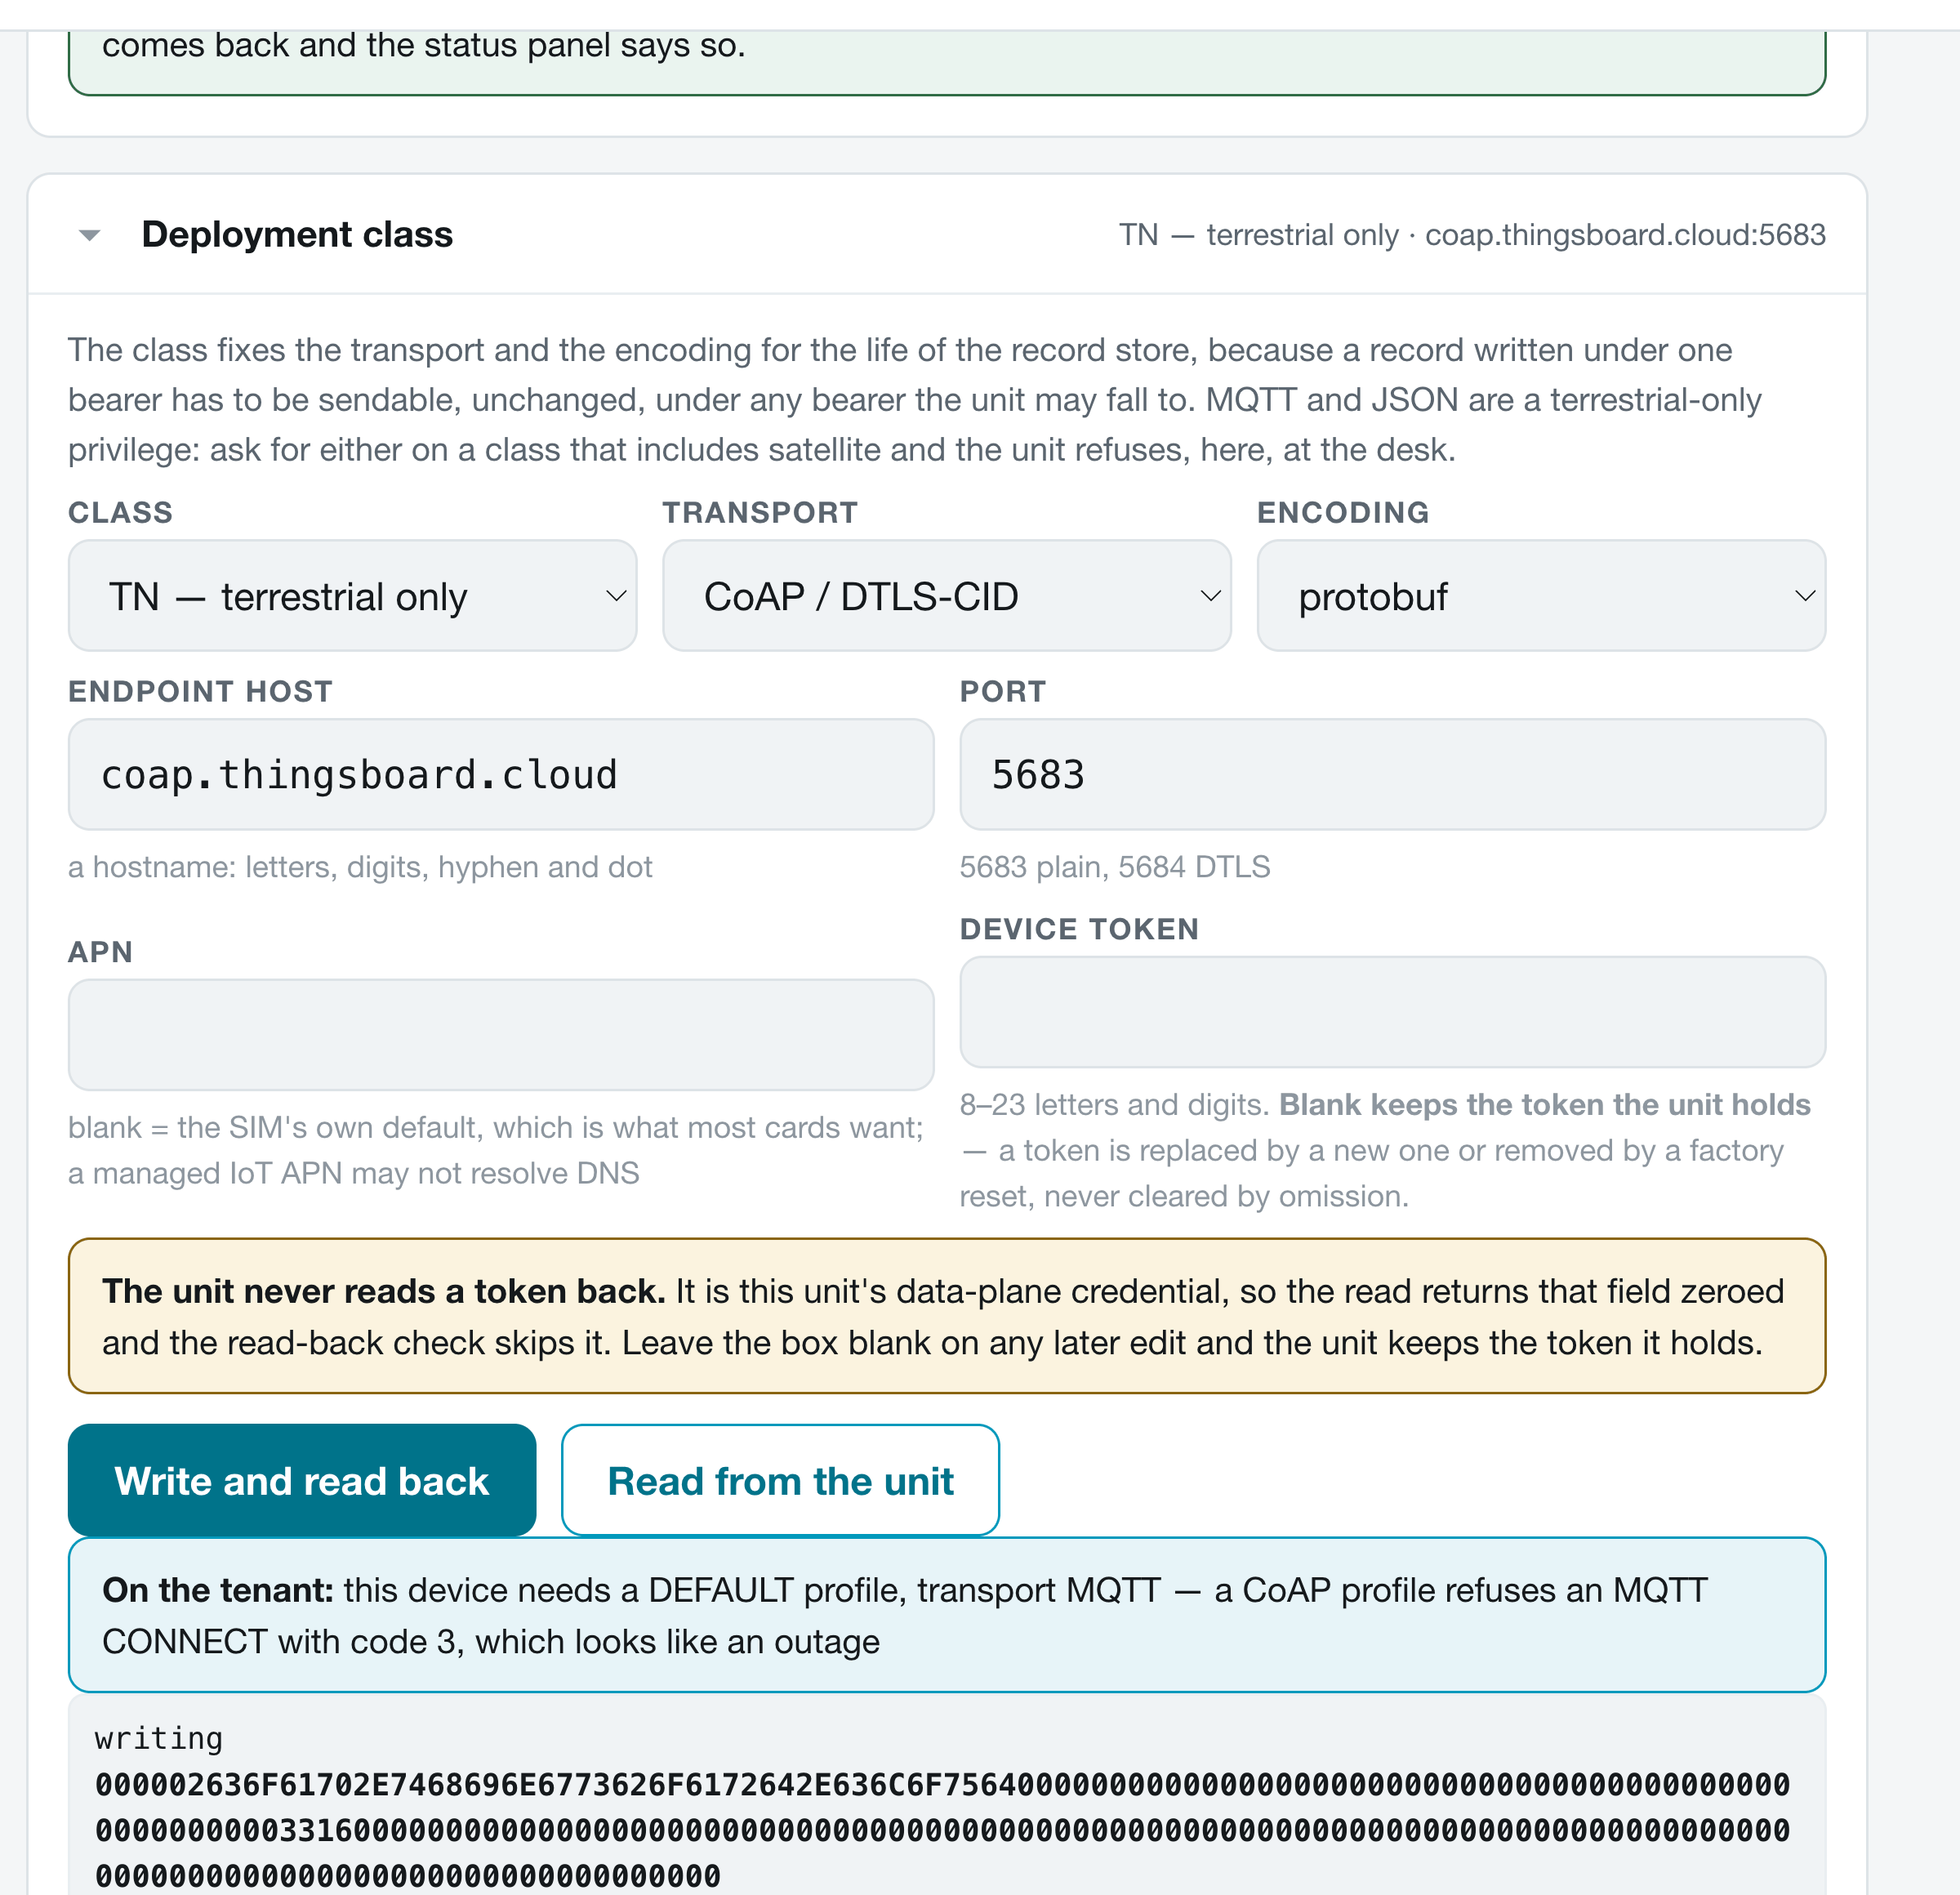
Written and read back in the right order.
Step 5: Admit your sensor
about 5 minutes A commissioned unit with no access list ingests nothing. That is deliberate: on a metered link, admitting whatever happens to be nearby is a bill somebody else writes for you.

Nothing is ingested by accident. Only an admitted advertisement gets a short id, a digest and a record in the store. Everything else is counted and forgotten, or held where you can look at it.
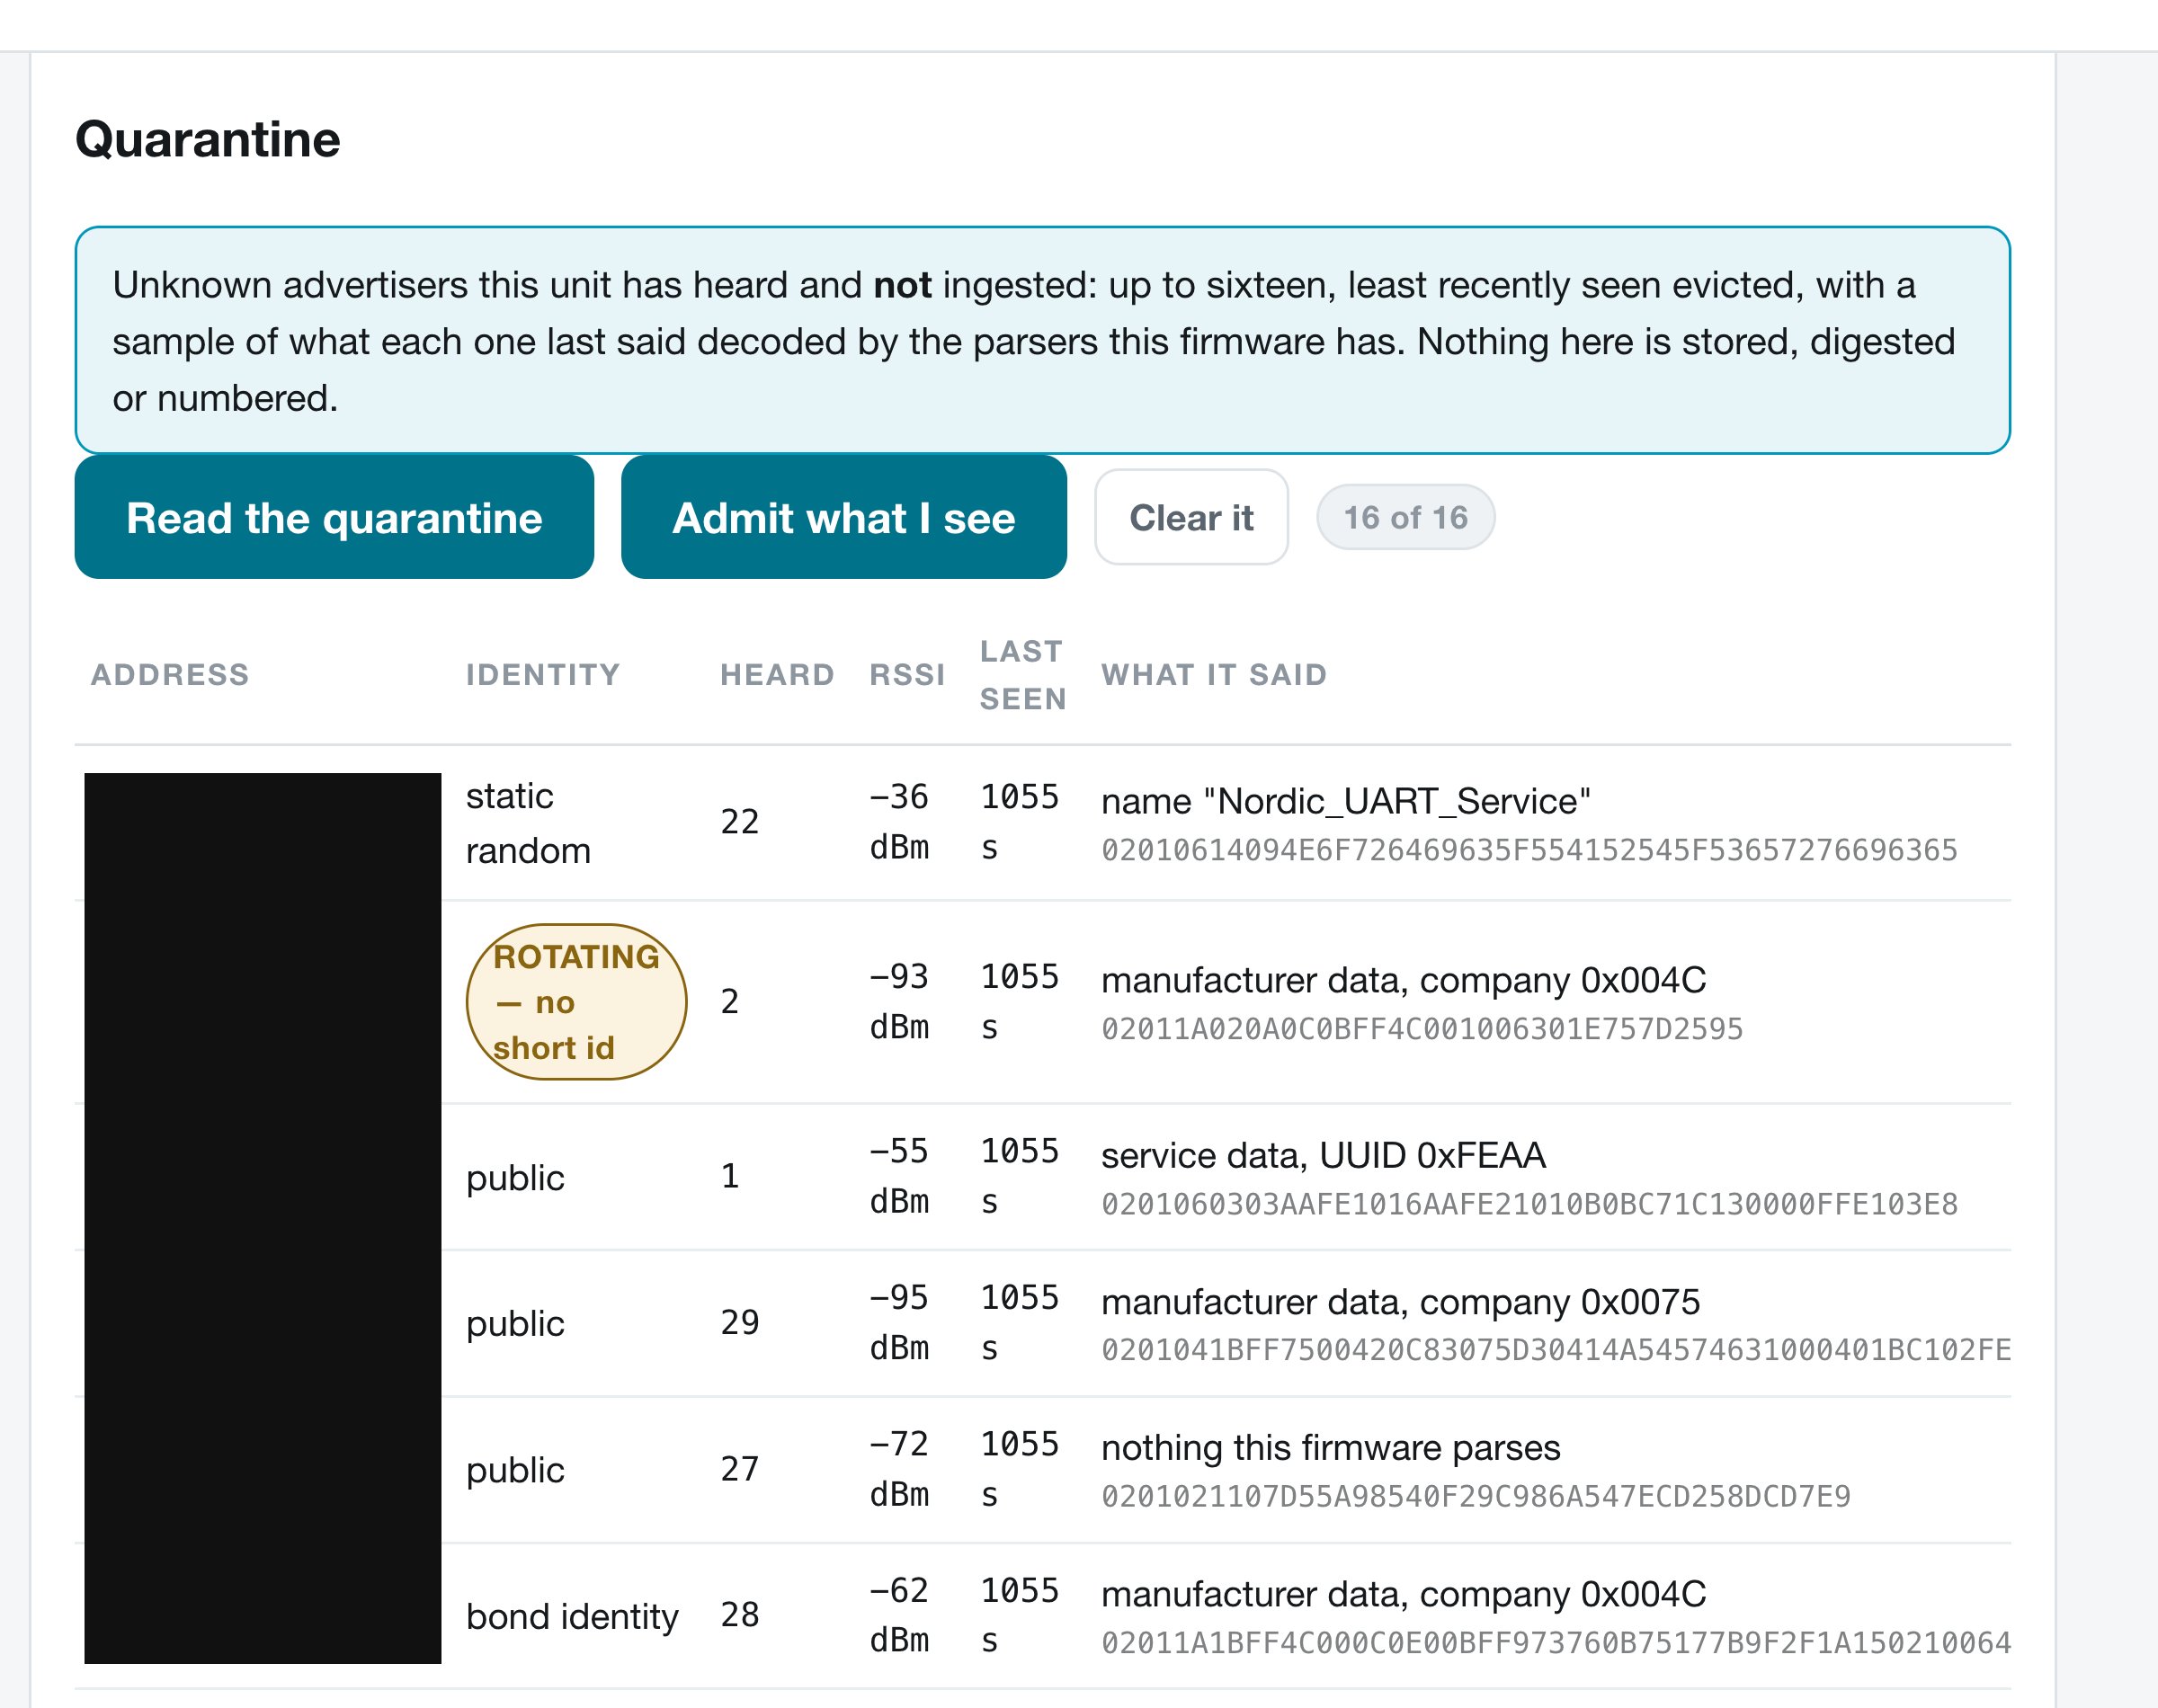
The quarantine: what the unit has heard and deliberately not taken. Note the one marked rotating: its address changes every fifteen minutes.
ADDRESS, profile, label, short id. Then Write the expected list, then Read from the unit. Three things that will otherwise surprise you:
- Writing replaces the whole list. It is not an append: send every entry you want kept, every time.
- An entry admits its device on its own, no rule needed, and fixes its short id by list order, so numbering is identical on every unit given the same list.
- A rotating address is refused, by line number. A reserved slot would point at something that stops existing.
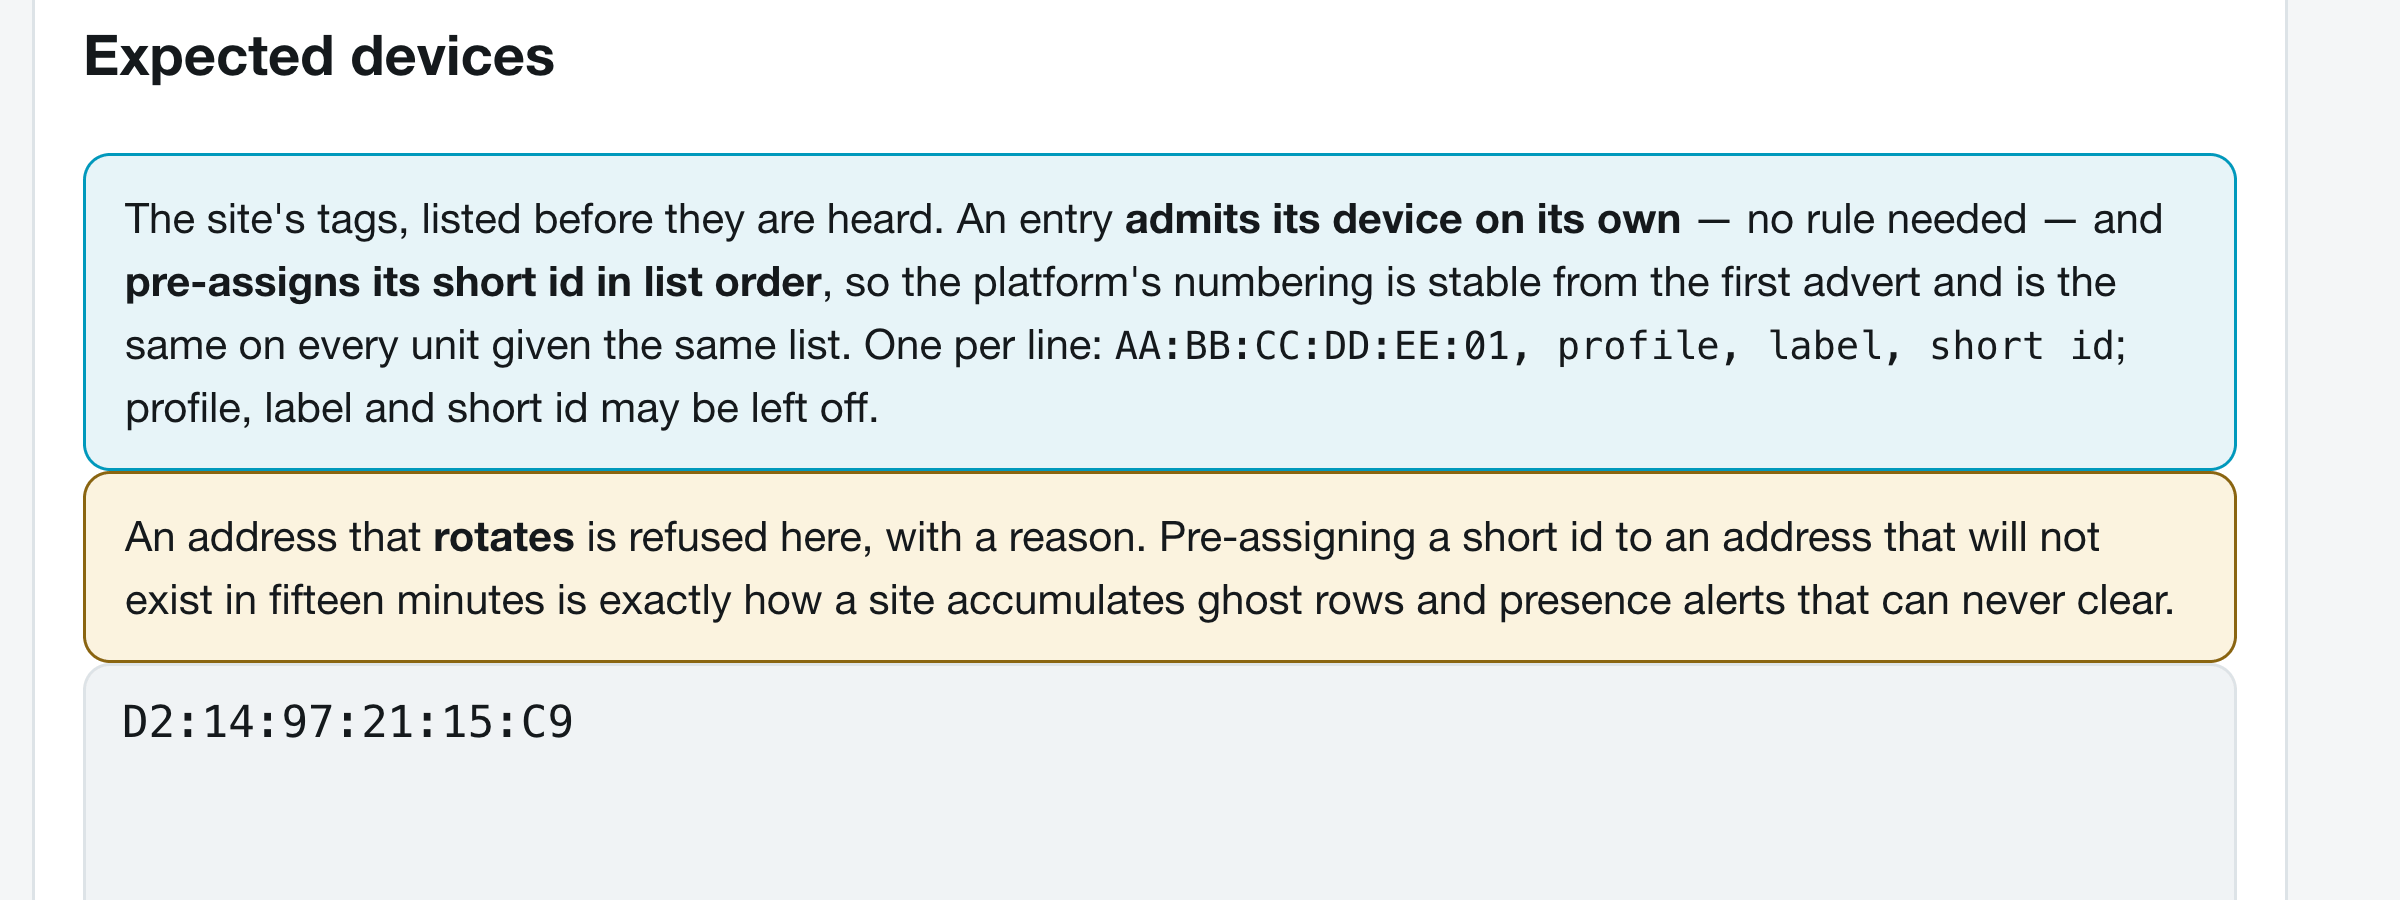
Written, then read back from the unit.
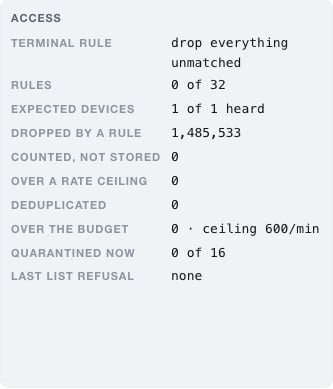
The counters that matter. Expected devices: 1 of 1 heard, the expectation the unit is actually enforcing, matching reality. The large dropped count is the rest of the room, working as designed.
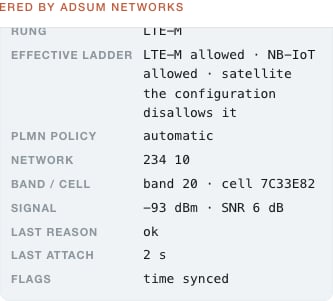
The modem's own account of itself. The effective ladder explains each rung: here satellite is excluded because the configuration excludes it, not because anything failed.
Step 6: Send readings to your platform
about 10 minutes, plus one radio cycle

The whole path. The token is what makes the last hop yours; without it the unit has nowhere to send and its uplink stays at never.
On your tenant
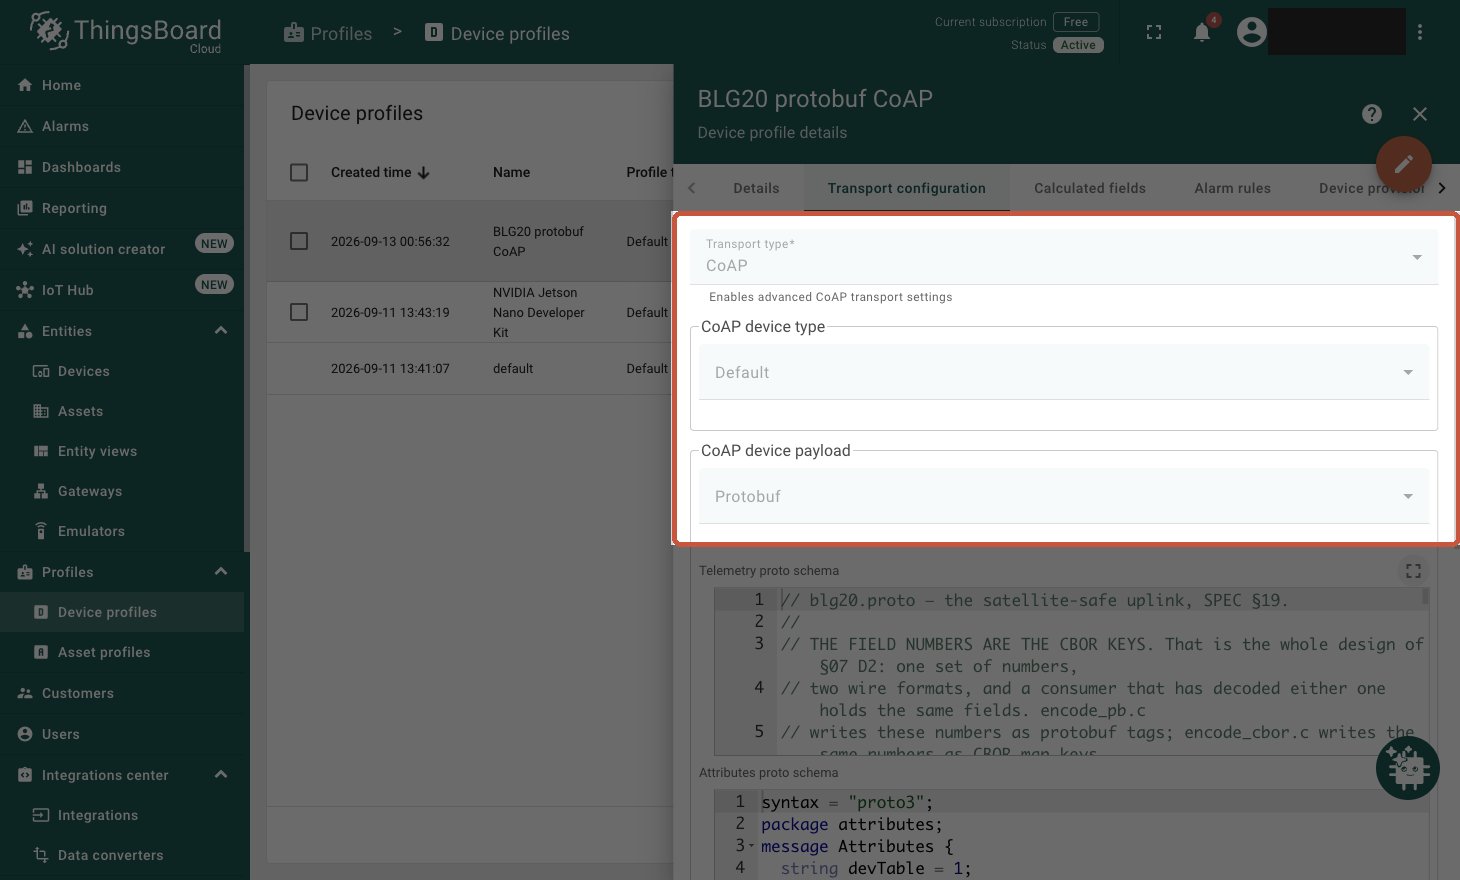
Transport CoAP, payload Protobuf. These two fields are the whole step: get either wrong and the readings silently never arrive.
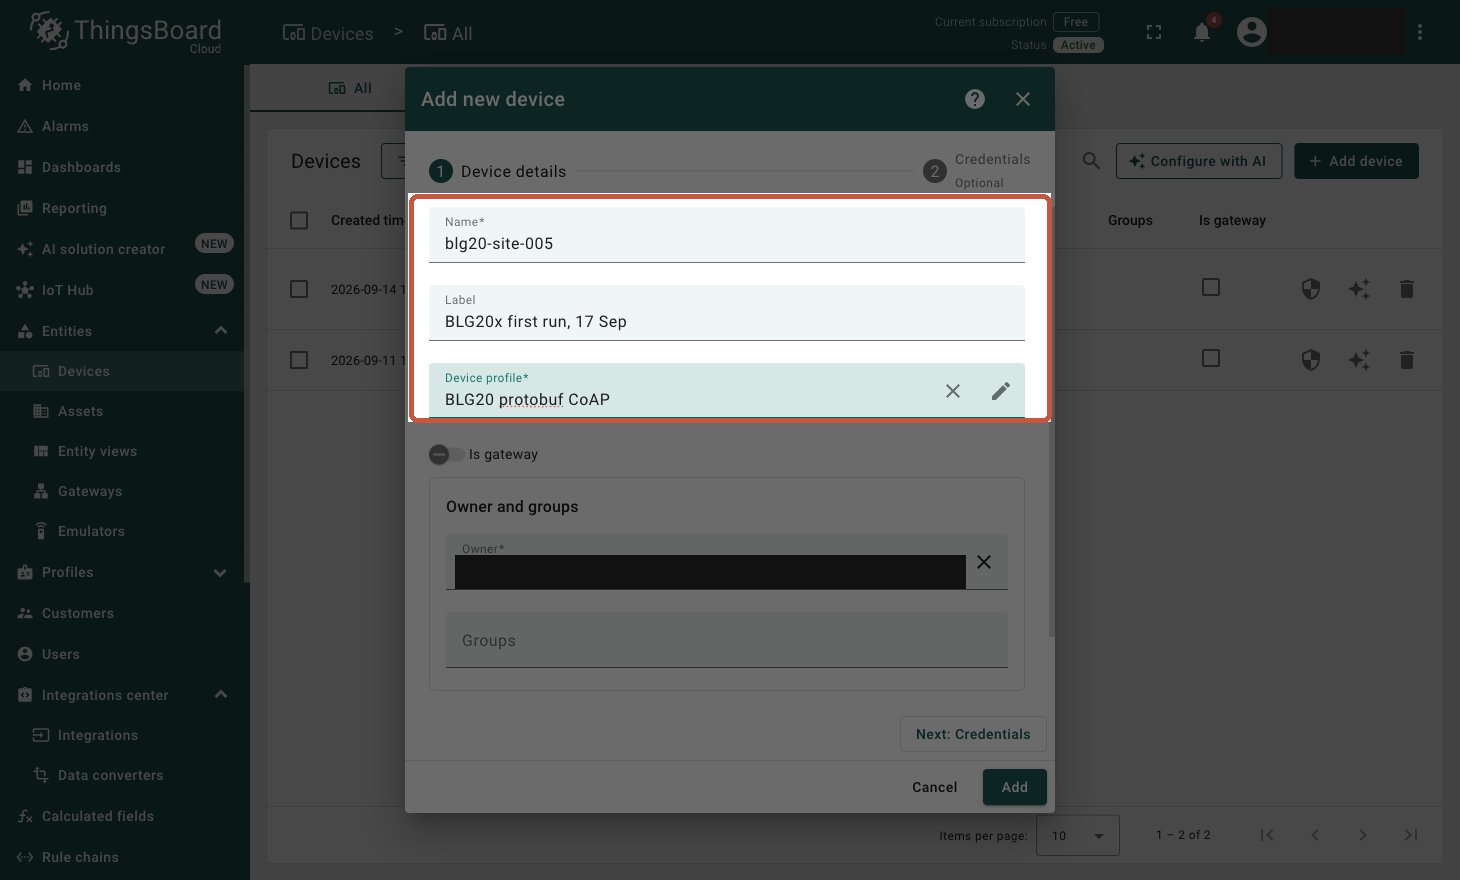
A device on that profile. The name is yours; it is how you will find it again.
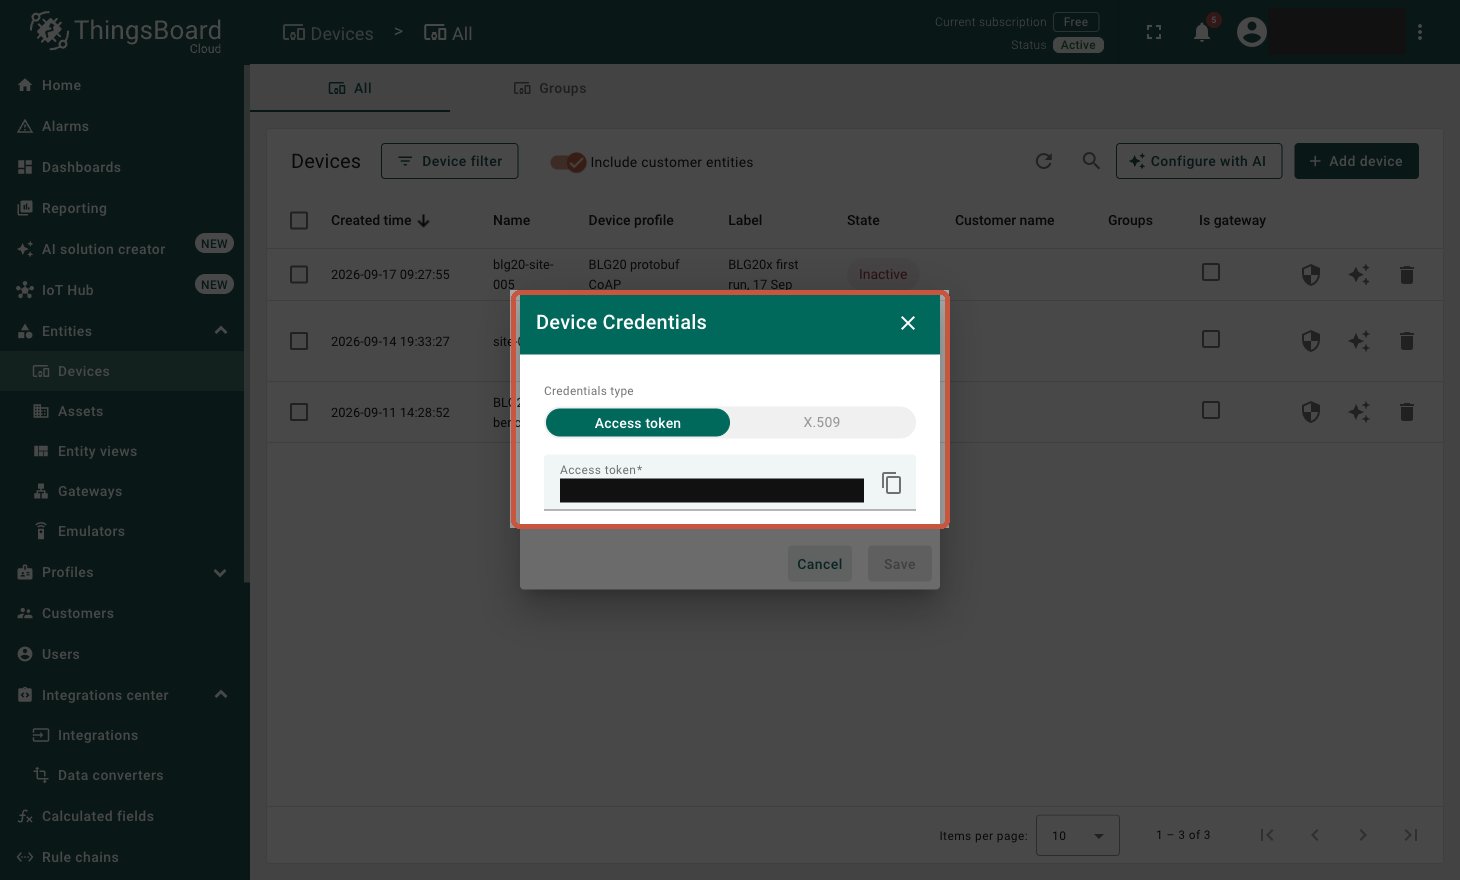
The device's access token. Copy it: this is the one value the unit will never read back to you.
On the unit
Back on the Deployment class panel: transport CoAP / DTLS-CID, encoding protobuf, your host and port, APN blank unless your SIM needs one, and the token pasted in.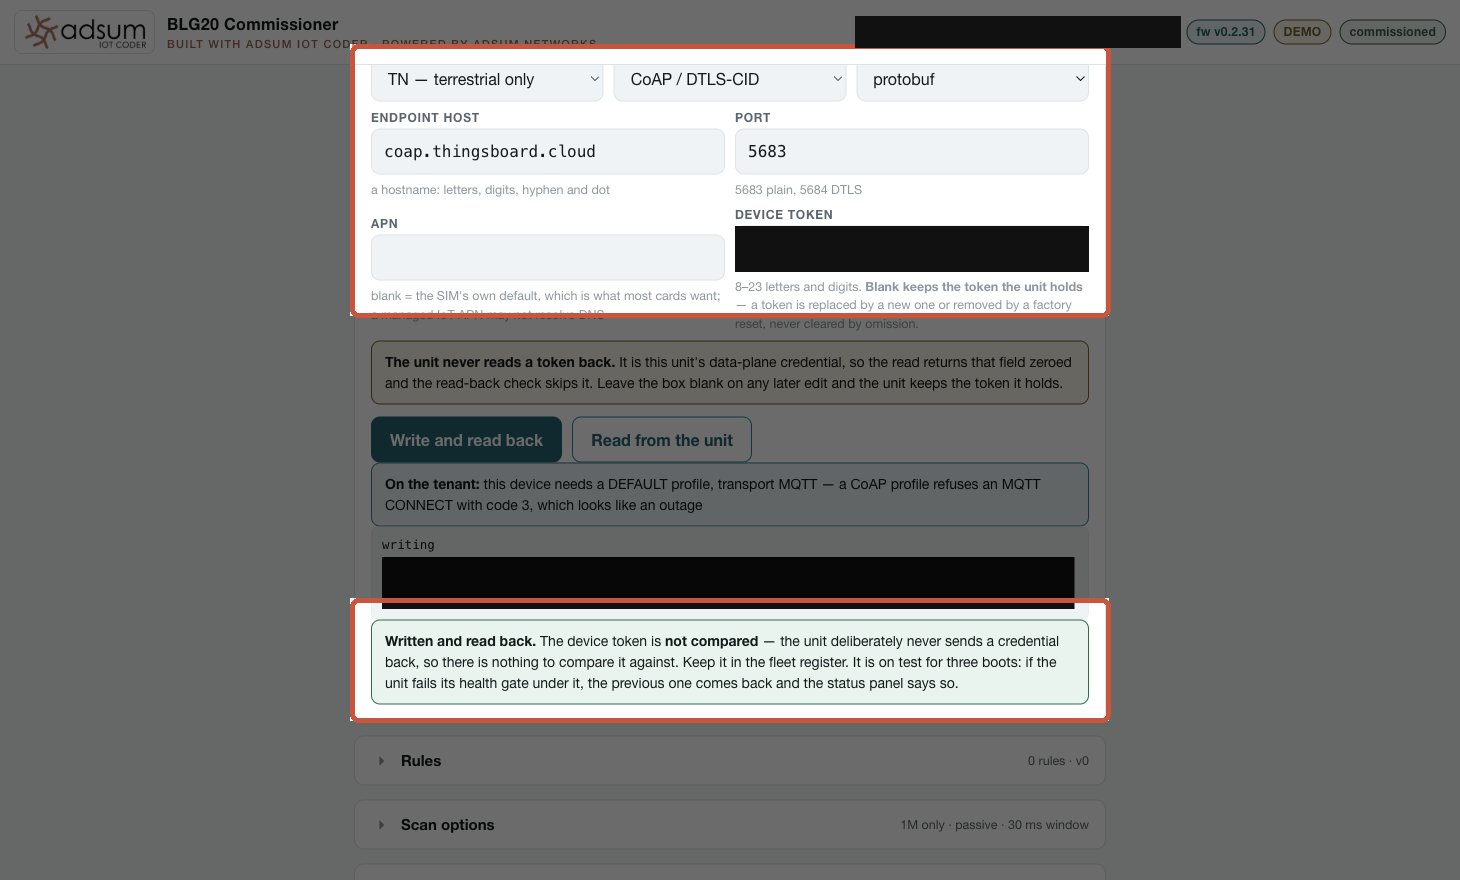
Written and read back. The token is deliberately excluded from the comparison: the unit never sends a credential back, so there is nothing to compare against. It is on test for three boots: if the unit fails its health gate under it, the previous one returns and the panel says so.
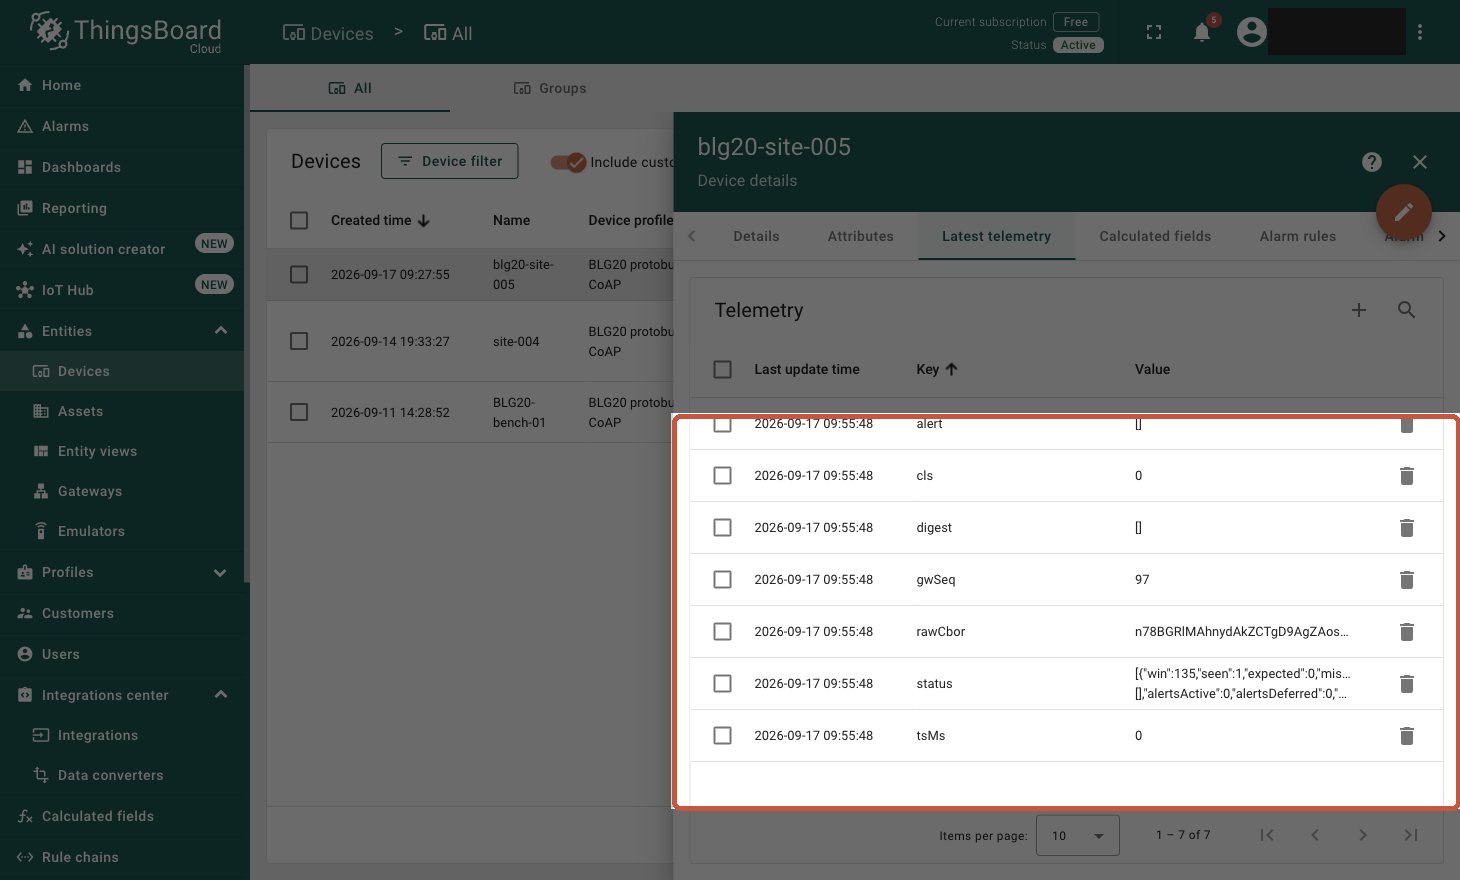
The first record. Several intact keys, each carrying the device's own timestamp: that is what proves the profile is right. Had the payload type been wrong, the whole reading would have collapsed into one field named after the wrapper.
2.01: the platform took the reading.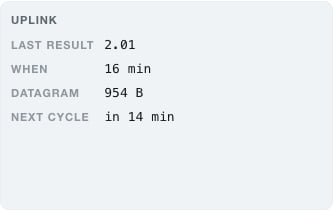
The unit's own account of its last uplink: the result code, how long ago, the datagram size, and when it will go again.
Step 7: Send a command back
one radio cycle Everything so far travelled outwards. This step goes the other way, and it is the only step that proves you can reach into a deployed unit from your desk.

Why only the far end counts. The sender saying "I sent it" proves nothing: in an earlier measured run one message in two was lost between the halves and both ends reported no drops, because neither was counting something it never knew about.
cmd, type string, value clear_latch.
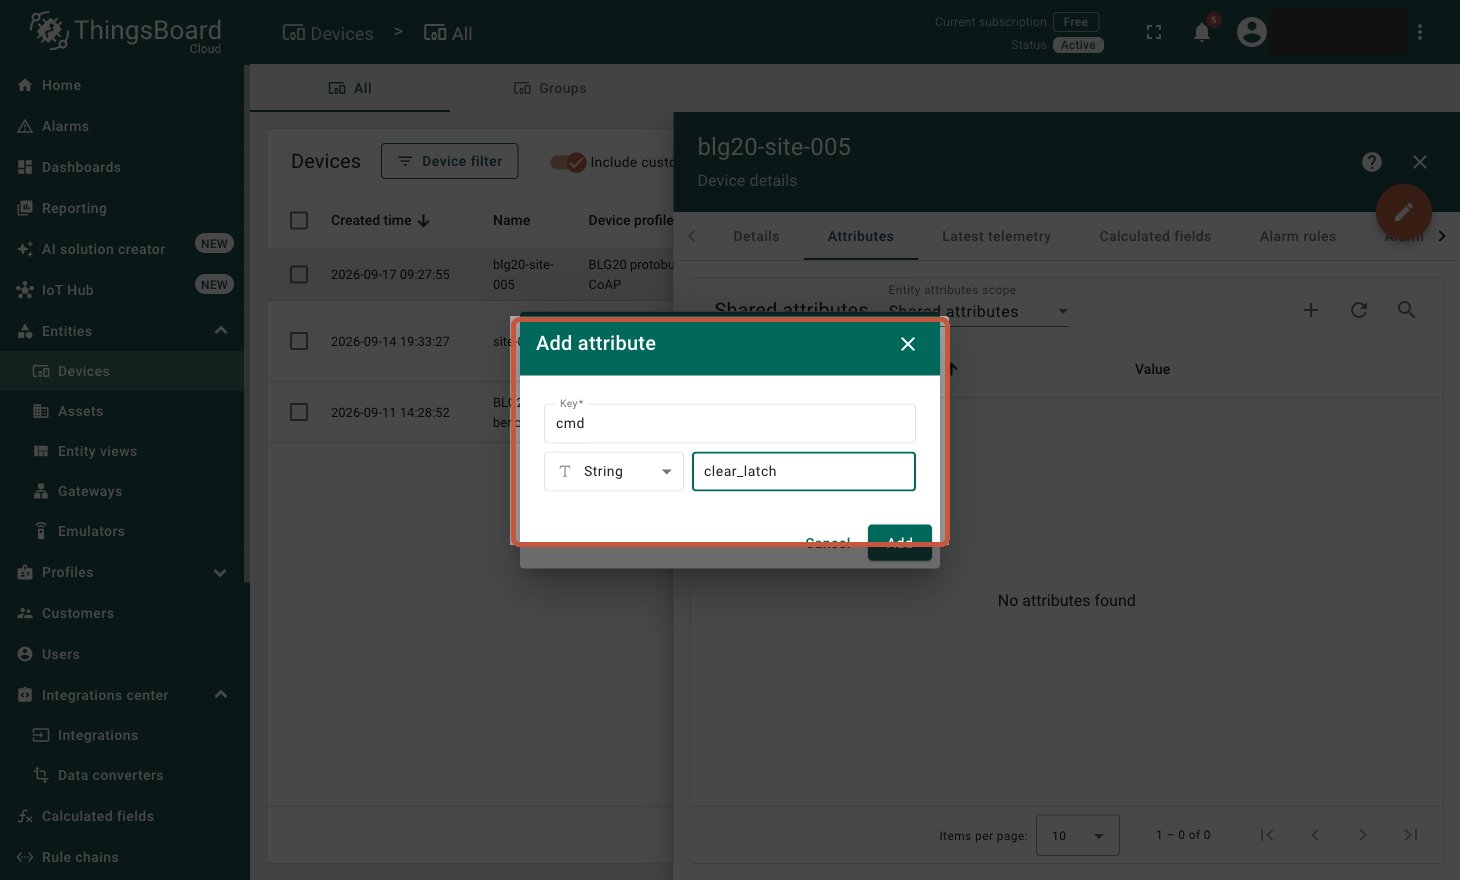
The shared scope, not server, not client. The wrong scope gives the unit a 4.04 when it polls.
NEXT CYCLE is your wait. Rebooting to hurry it only restarts the clock.
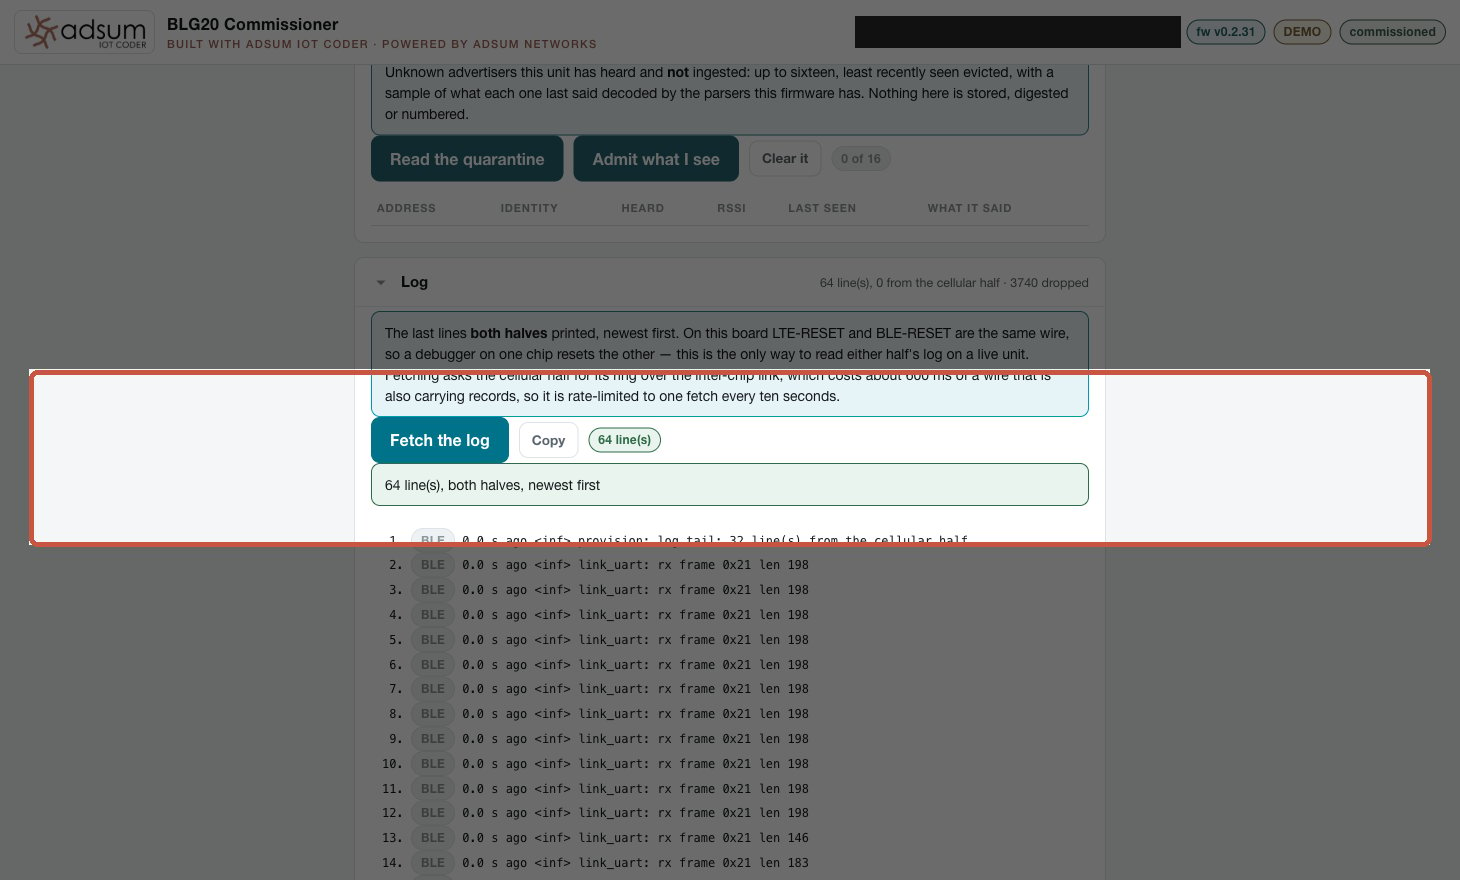
This line is the pass, and only this line. It comes from the Bluetooth half, preceded by the frame arriving over the link. 0 latch(es) cleared is correct on a unit with no alert rules: we are proving the command arrives, not that it does something dramatic.
When something looks wrong
These are the ones that cost real time, with what they actually mean.What this firmware will not do
Ways on from here
- Our verified build for the units you ship
- The source of our firmware, the Bluetooth half or both, with the advanced knowledge to build on it and customise it
- We build it for you
Captured on a BLG20XE02C-V1 with the published evaluation pair, verified on macOS. Coordinates and credentials in the figures are masked for this page; on your own unit they appear in full.